# Exchange configuration - Azure APP
# Register your application
To use OAuth, an application must have an application ID issued by Azure Active Directory. In this tutorial, it is assumed that the application is a console application, so you need to register your application as a public client with Azure Active Directory. You can register an application in the Azure Active Directory admin center or by using Microsoft Graph.
Open a browser and navigate to the Azure Active Directory admin center and login using a personal account (aka: Microsoft Account) or Work or School Account.
Select Azure Active Directory in the left-hand navigation, then select App registrations under Manage.
Select New registration. On the Register an application page, set the values as follows.
Set Name to a friendly name for your app.
Set Supported account types to the choice that makes sense for your scenario.
For Redirect URI, change the dropdown to Public client (mobile & desktop) and set the value to "urn:ietf:wg:oauth:2.0:oob".
Choose Register. On the next page, copy the values of the Application (client) ID and Directory (tenant) ID and save them, you will need them later.
# Configure for app-only authentication
To use application permissions, follow these additional steps.
On the app page under Management, select Manifest.
On the Manifest page that opens, find the requiredResourceAccess entry (on or about line 47). Modify the resourceAppId, resourceAccess id, and resourceAccess type values as shown in the following code snippet:
"requiredResourceAccess": [
   {
      "resourceAppId": "00000002-0000-0ff1-ce00-000000000000",
      "resourceAccess": [
         {
            "id": "dc890d15-9560-4a4c-9b7f-a736ec74ec40",
            "type": "Role"
         }
      ]
   }
],
When you're finished, click Save.
Select API permissions under Manage. Confirm that the full_access_as_app permission is listed.
Select Grant admin consent for org and accept the consent dialog.
Select Certificates & Secrets in the left-hand navigation under Manage.
Select New client secret, enter a short description and select Add.
Copy the Value of the newly added client secret and save it, you will need it later.
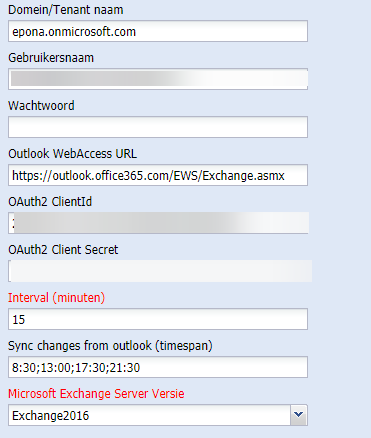
Information in ContactManager:
Enter the Application ID in the field "Oauth2 ClientID"
Enter the client secret value in the field "Oauth2 Client Secret"
Click on Save. After saving the secret will dissappear and will be saved encrypted in the SQL Database.