
# EWS (legacy) App Registration
This page covers the legacy Exchange Web Services (EWS) connection only. Microsoft no longer develops EWS and is retiring it — see the Overview for the retirement dates and the tenant switch that extends the runway. New setups use the Microsoft Graph app registration in Setup instead; follow the steps below only while a mailbox still connects over EWS.
# Overview
The EWS connection signs in to Exchange Online with an app registration that has application-wide
mailbox access, and then acts on behalf of the mailbox it is synchronising (impersonation). It reads
the same OAuth2 ClientId, OAuth2 Client Secret and Domain / Tenant Name fields on the MS
Exchange Configuration screen as the Graph connection, but the app registration behind those values needs
different permissions: the EWS permission full_access_as_app on Office 365 Exchange Online,
instead of the Microsoft Graph permissions listed in Setup.
Because that permission cannot be requested through the normal permissions picker, it is added by editing the app registration's manifest.
# Register the application
- Open the Microsoft Entra ID admin center and go to App registrations → New registration.
- Give the registration a recognisable name.
- Under Supported account types, choose the option that matches the customer's situation — for a single tenant, accounts in this organizational directory only. Leave the redirect URI empty: the connection signs in as the application itself, so no redirect is used.
- Register the application, then copy the Application (client) ID and the Directory (tenant) ID from the overview page — both are needed in ContactManager.
# Grant application-wide mailbox access
On the app registration, open Manage → Manifest.
Find the
requiredResourceAccessentry and replace it with the block below. The resource is Office 365 Exchange Online and the permission isfull_access_as_app, granted as an application role."requiredResourceAccess": [ { "resourceAppId": "00000002-0000-0ff1-ce00-000000000000", "resourceAccess": [ { "id": "dc890d15-9560-4a4c-9b7f-a736ec74ec40", "type": "Role" } ] } ],Save the manifest.
Open Manage → API permissions and check that
full_access_as_appis listed.Choose Grant admin consent for the organisation and accept the dialog.
# Create a client secret
- Open Manage → Certificates & secrets.
- Choose New client secret, enter a short description and add it.
- Copy the secret value immediately — it is shown only once.
Note the secret's expiry date: when it expires, the EWS connection stops working and a new secret has to be entered in ContactManager.
# Enter the values in ContactManager
On the MS Exchange Configuration screen:
| Field | Value |
|---|---|
| Domain / Tenant Name | The Entra ID tenant (directory) ID, or the tenant's fully qualified domain name — its default *.onmicrosoft.com domain (for example contoso.onmicrosoft.com) or any other domain verified on that tenant (for example contoso.com), never just the bare prefix. This page always uses OAuth2/certificate authentication, so this is the tenant, never a Windows domain (see Domain / Tenant Name in the module manual) |
| OAuth2 ClientId | The application (client) ID |
| OAuth2 Client Secret | The client secret value |
| Outlook WebAccess URL | The EWS endpoint — for Exchange Online https://outlook.office365.com/EWS/Exchange.asmx |
The mailbox Username and Password stay empty: with a client ID filled in, the connection authenticates as the application and impersonates each mailbox.
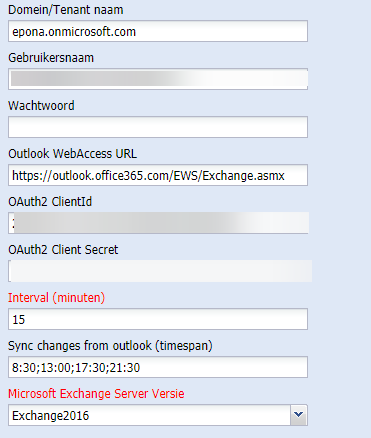
Save the screen. The secret disappears from view after saving and is stored encrypted in the database.
Use Test Outlook on the same screen to check that the connection works for a given mailbox. The connection that is actually used depends on what is configured — see How the connection is chosen.