# Installation
This manual was updated 02 April 2026 using Epona365 Office version 25.1 (25.1.167)
# Introduction
This Modern Add-in (APP) deployment guide is written for Azure and M365 administrators with knowlegde of Powershell.
The documentation consists of four parts:
- Preparation and installation steps in the M365 tenant; setting up an Azure subcription, deploying Epona365 Office from the Azure private app store
- Architecture overview of the Self-Hosted Azure Containers to be deployed
- Deploying and configuring the APPs in the Office and Outlook environment
- Enabling and configuring optional APP components, such as AI filing predictions or OCR functions of the deployed Epona365 Office APP
Please contact the Epona helpdesk on helpdesk@epona.com for assistance with these deployment steps. You can only deploy Epona365 if you have shared our Azure Subscription ID with our helpdesk.
# Prerequisites for deployment
Epona365 Office is the name of the Outlook and Office Modern Add-ins connected to Azure containers performing data processing tasks. For the deployment you will need:
- An Azure Subscription with proper access (owner) to verify and add Resource Providers
- The Azure Subscription ID needs to be shared with Epona, to open the Azure Marketplace Private Plan to the Subscription
- PowerShell 7 on a Windows machine with the Az module installed
- Run a PowerShell script that creates two or three Entra ID Registered Apps, and binds these Apps to containers
- Global Admin approval for the API permissions of the two or three Entra Apps
- Global Admin or equivalent permissions to deploy the Outlook and Office manifest files to Microsoft 365 (Integrated Apps)
- Global Admin access to perform post deployment configuration steps in the web container /portal page or create an Entra ID security group to which this access is assigned, the members need access to the Epona365 Site Collection hosting the Matters-list
- In DMS Configuration Center, Settings the URL of the Epona365 Office needs to be registered
Before Epona365 Office can be deployed, please ensure that you are able to deploy Azure resources. The Epona365 Office APP will deploy azure infrastructure in a pay-per-use model. This means that if the APP functions are used, you will use small micro services called Container APPs to perform document management and e-mail management functions. For this consumption of Azure resources, a payment subscription with Microsoft needs to be in place.
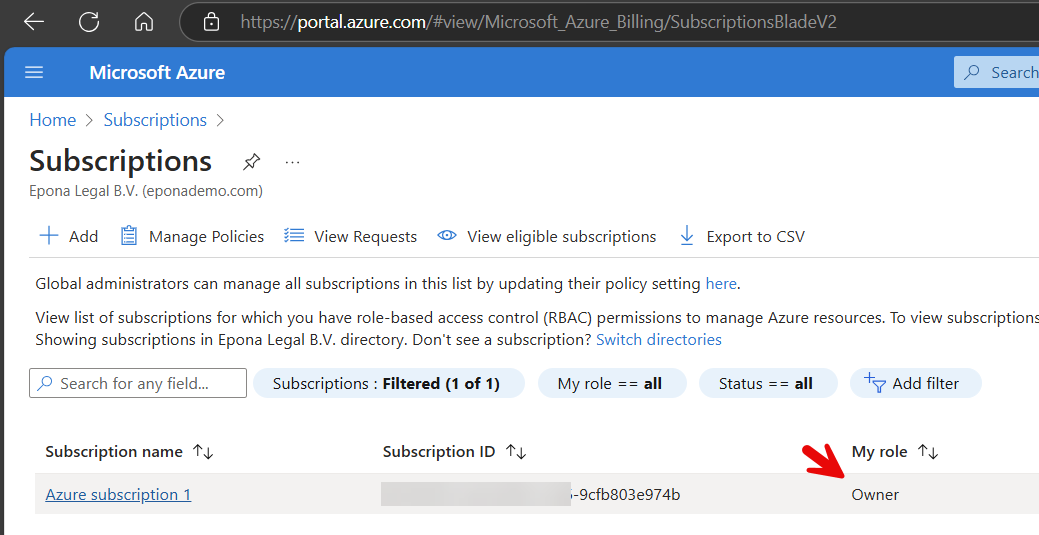
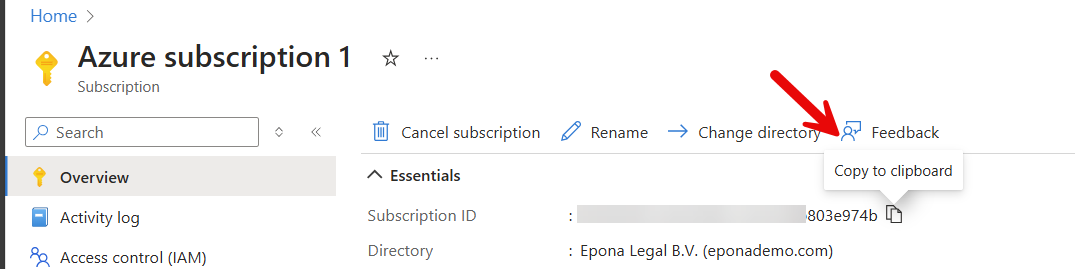
The first prerequisite is an Azure Subscription. You need to create an Azure Subscription in https://portal.azure.com (opens new window) and share the Subscription ID with Epona, so that we can open the Azure Marketplace Private Plan for your company. Please send the Subscription ID to helpdesk@epona.com. We will confirm the addition of your Subscription ID to the Private Audience of this Azure Private Plan. It sometimes takes one hour before that Private plan is available.
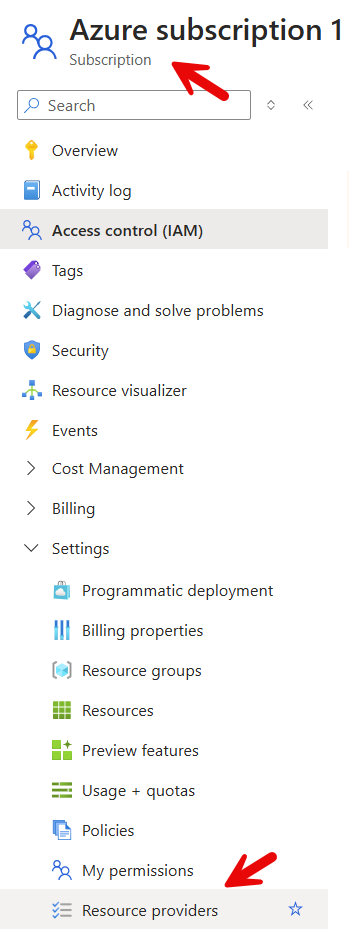
Please also check your Role in the Azure Subscription that you plan to use for deploying the Epona365 Office resources. Your minimum role assignment should be: Contributor and User Access Administrator, preferably you are the Owner of the Azure Subscription
The second prerequisite is the Azure Subscription Resource Providers. You need to have Microsoft.App and Microsoft.ContainerService registered as Resource Providers in your Azure Subscription for the deployment of Epona365 to work
Filter for Microsoft.App, check the Registration status, if not registered, then Register the Microsoft.App resource provider
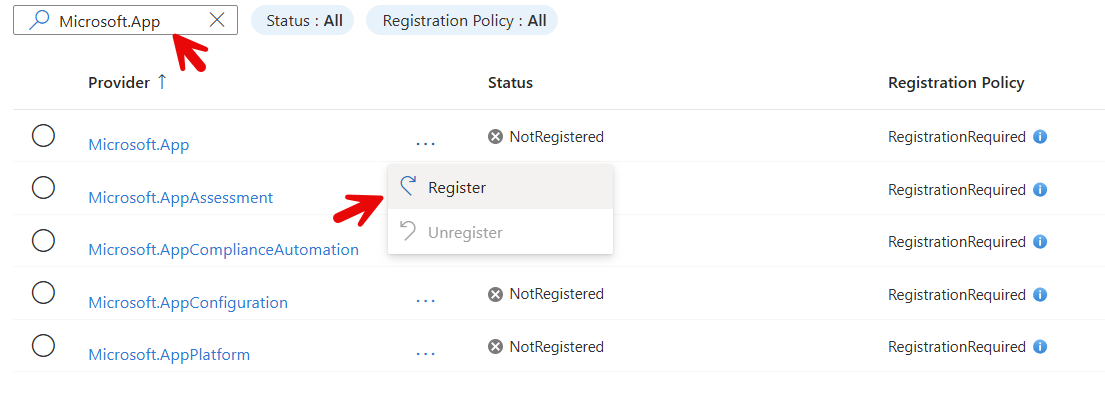

Filter on Microsoft.Container, check the Registration status of Microsoft.ContainerService and Register this resource provider

The third prerequisite is sometimes difficult in larger organizations. After the Container deployment, the next step in the installation process is a one-time step to run a PowerShell script. This script assumes that the user running the script has access to the Azure Subscription and the resources deployed, and this user should be able to Create and Configure two EntraID Registered Apps. In some organizations there is a separation between the Azure team and the Entra ID team, in those cases the PowerShell script cannot be deployed and manual deployment steps are required.
The fourth and last prerequisite is the use of Powershell version 7.x or higher. Please also ensure that you run Powershell from a Windows workstation, we have noticed that the Certificate download stage of our Powershell script fails when using Powershell on an Apple Mac.
# Architecture overview
Azure container apps are small micro services that you instantiate when there is demand for the service. These apps could scale well and will also resume to a shutdown state if there is no activity. With Azure container apps you are consuming a set of resources in an on-demand environment. The resources required for the Epona365 will be automatically created when you deploy a Private Plan from the Azure store and choose a Channel from the Epona365 offering. The Channel gives you the ability to define which version of the APP software and services you are offering to your users. It would also give you the ability to revert back to previous releases (channels) should something unplanned happen. When you deploy Epona365 contain apps a number of services will be automatically created. This chapter endeavours to describe the function of these services and their connections to the outside world.
Remark: some of the screenshots below might not reflect the resources that you see, this depends on the choices made during deployment and the version of the product deployed in your azure environment
Future deployments of Epona365 might contain new Azure resources to be used. We will never roll-out new resources in a Channel. Channels will only be hotfixed if necessary (let’s hope not) and new Channels will provide new functions and if required also new resources to be used.
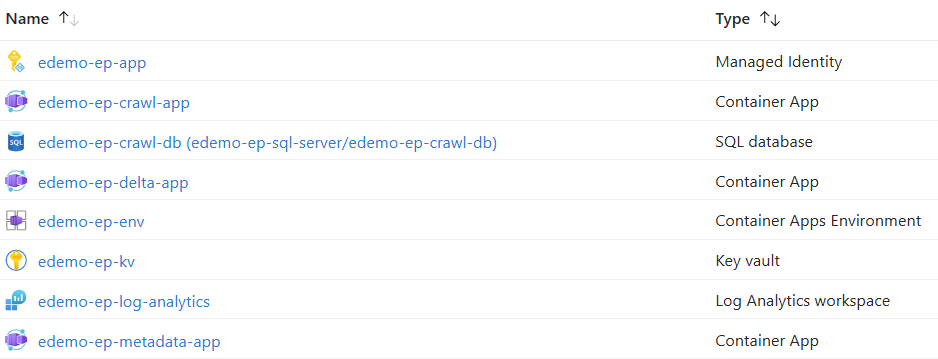
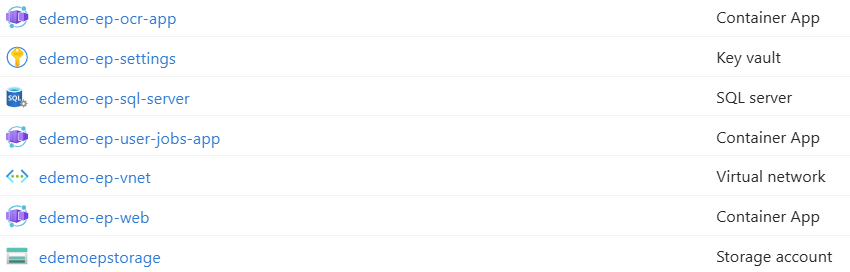
| Resource | Type | Function | Connections |
|---|---|---|---|
| ep-app | Managed Identity | Authentication information to access the Epona365 resources in the VNET | |
| ep-app-insights | Local Application Insights resource | Providing application insights in to logs, telemetry checking of resource health and usage | |
| ep-crawl-app | Container App | processes jobs from the crawl queue. Crawl processes running are crawl matters, crawl matter and crawl documents | Use the Managed Identity to connect to the epstorage Storage account using Secure transfer for REST API connections within the VNET. Use Azure Key Vault (ep-kv) to cache access tokens. Access Sharepoint using an application permission. |
| ep-crawl-db | SQL database | Storage of the Filing Suggestions crawl data | |
| ep-cognitive-services | Optional AI service | Provide pay per use Azure OpenAI functions to Epona365 Office and Web users | |
| ep-delta-app | Container App | processes jobs from the delta queue. Crawl processes running are full delta at the tenant level checking all matters, quick delta checking new matters, check document delta job. Check document delta will trigger new jobs to be created | Use the Managed Identity to connect to the epstorage Storage account using Secure transfer for REST API connections within the VNET. Use Azure Key Vault (ep-kv) to cache access tokens. Access Sharepoint and Graph using an application permission. |
| ep-env | Container Apps Environment | Configures and defines the Dapr components, outlining service connections of all Container Apps | |
| ep-kv | Key vault | Key Vault saves the access tokens. | |
| ep-log-analytics | Logging resource | Storage resource for application logging | |
| ep-metadata-app | Container App | The predict metadata job uses OpenAI to auto predict document metadata on exiting or new documents. | Use the Managed Identity to connect to the epstorage Storage account using Secure transfer for REST API connections within the VNET. Use Azure Key Vault (ep-kv) to cache access tokens. Access Sharepoint using an application permission. ep-metadata-app also connects with Epona LegalGraph to send the jobs to OpenAI |
| ep-nsg | Network Security Group | New resource from 25.1.105 onwards to define Inbound and Outbound security rules, limiting network traffic to only allowed flows | |
| ep-ocr-app | Container App | processes jobs from the crawl queue. Crawl processes running are ocr matters, ocr matter and ocr documents | Use the Managed Identity to connect to the epstorage Storage account using Secure transfer for REST API connections within the VNET. Use Azure Key Vault (ep-kv) to cache access tokens. Access SharePoint through Graph using an application permission. |
| ep-search-services | Optional Azure AI RAG search | Azure AI storage space for AI indexing documents, will save document data | |
| ep-user-jobs-app | Container App | There are three types of user-jobs. High priority jobs are handled by the ep-web, Low, Medium priority jobs are handled by the ep-user-jobs-app | Accesses the ep-kv Key Vault accessing user tokens. Connects to the epstorage Azure Storage Account, connects to SharePoint and Microsoft Graph delegates permissions |
| ep-settings | Key vault | Key vault to store the settings of the registered Azure AD (Entra) APPs. In this keyvault Client ID and certificate of the Azure AD Apps are saved. | |
| ep-sql-server | SQL server | Services the SQL database | |
| ep-vnet | Virtual network | Defined virtual network for Epona365 internal traffic | |
| ep-web | Container App | Services the static webpages and scripts, the front-end web components. Provides the website for configuring Epona365. Provides the core Epona365 web API. Is responsible for High priority jobs. | Use the Managed Identity to connect to the epstorage Storage account using Secure transfer for REST API connections within the VNET to populate queues. Use Azure Key Vault (ep-kv) to cache access tokens. Access SharePoint CSOM and Graph using delegated permission. The web front end and API services are accessible from the Internet. Connections from clients use HTTPS, the Ingress proxy relays the inbound requests to the internal container HTTP port. |
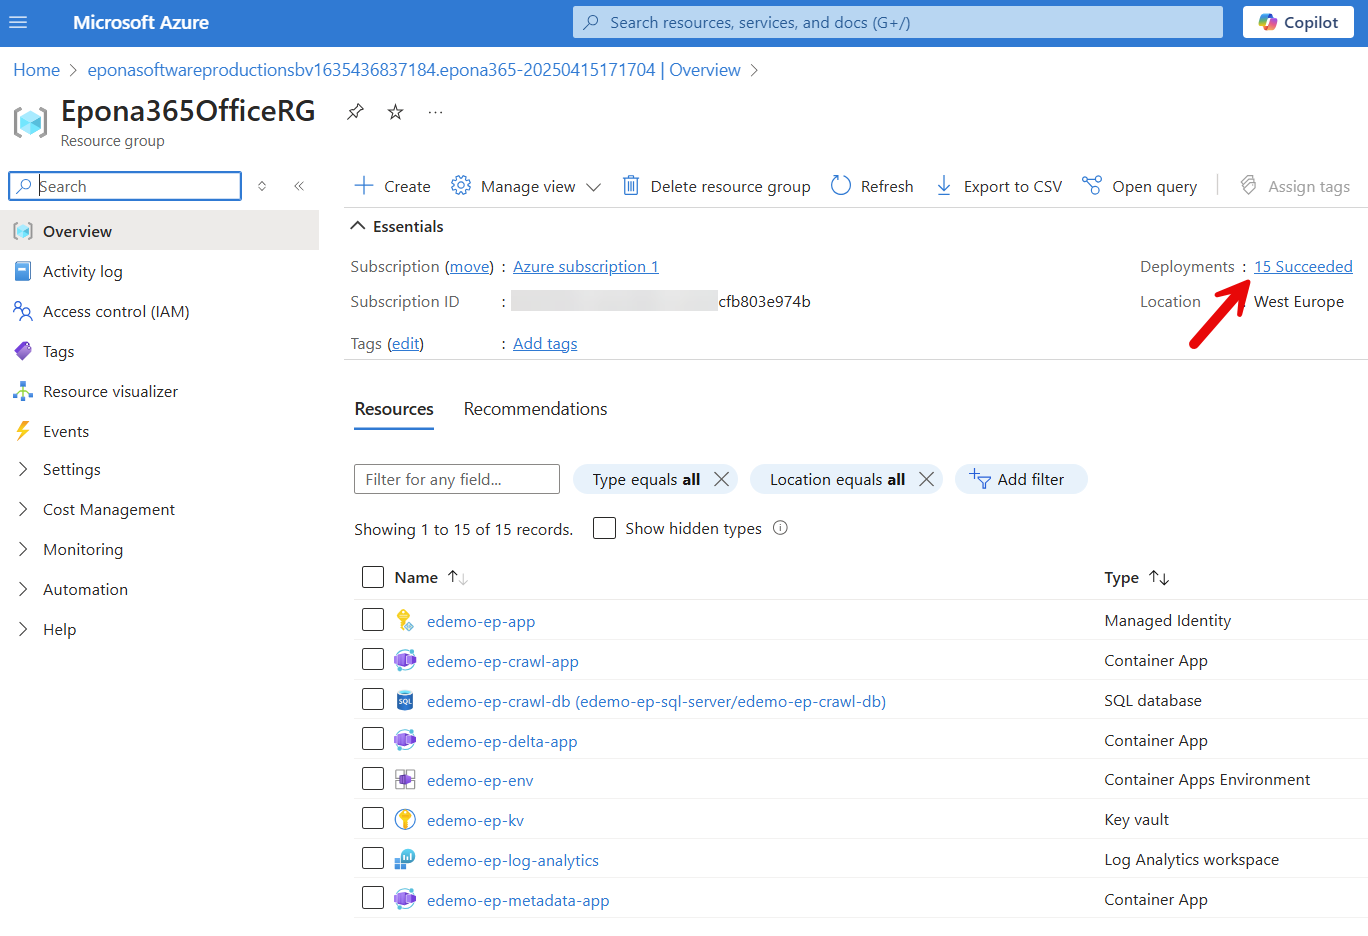
| epstorage | Storage account | Stores job queues, and other temporary state data. |
# Deploying the Epona365 Office resources in Azure
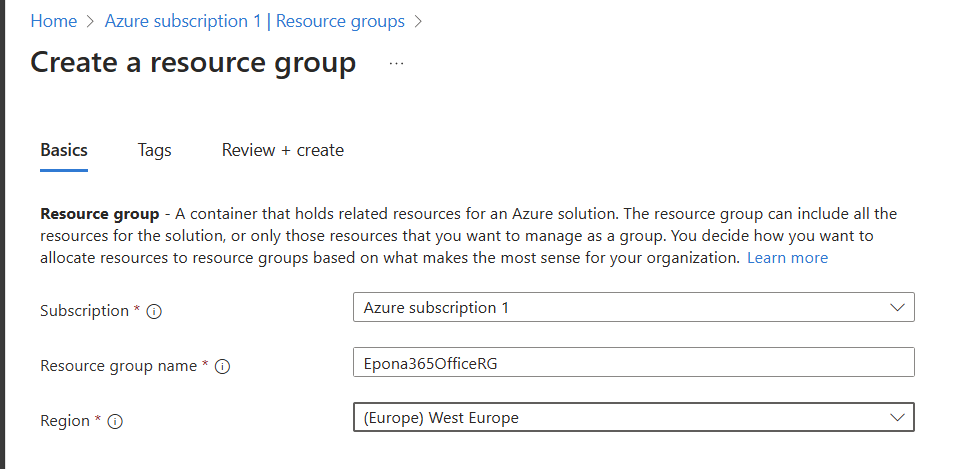
From the Azure subscription choose Resource groups and click Create to create a new resource group
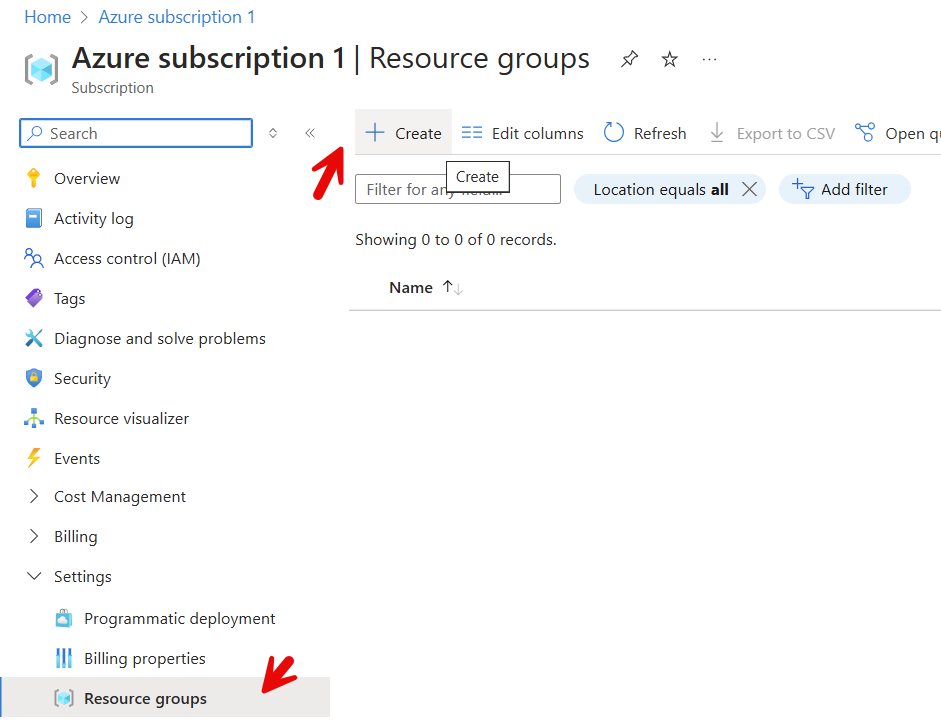
Enter the Resource group name, here Epona365OfficeRG, choose the Region, here (Europe) West Europe, review the tags and Create the Resource group
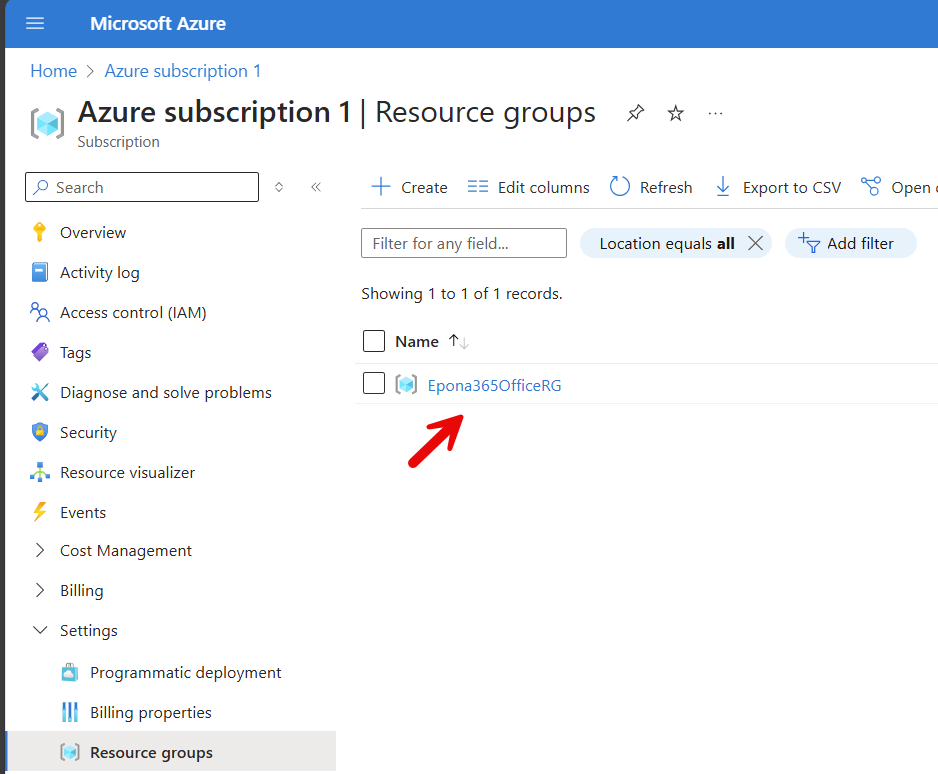
Select the Resource group to start the deployment of Epona365 Office resources into that group
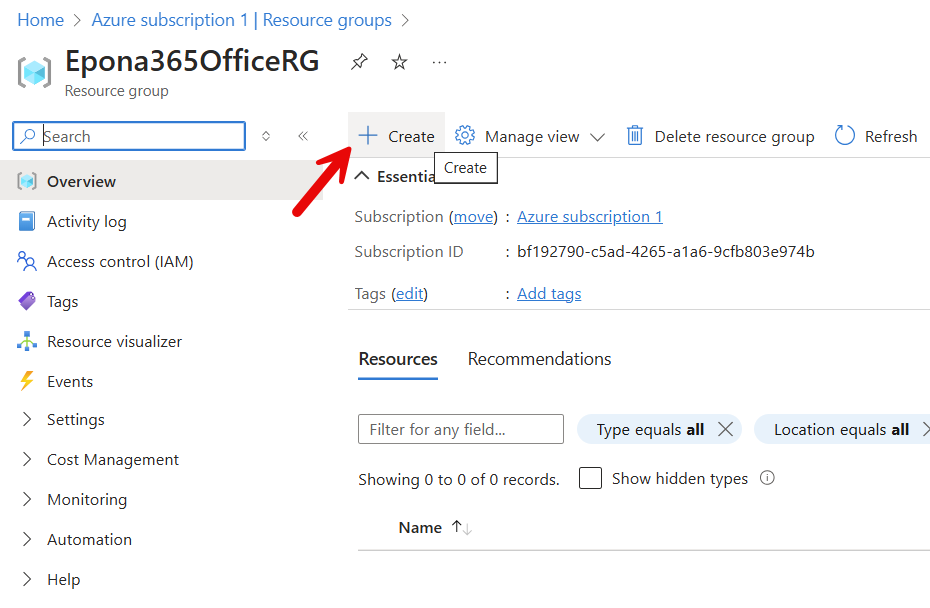
Click Create in the Resource group to be redirected to the Azure Marketplace
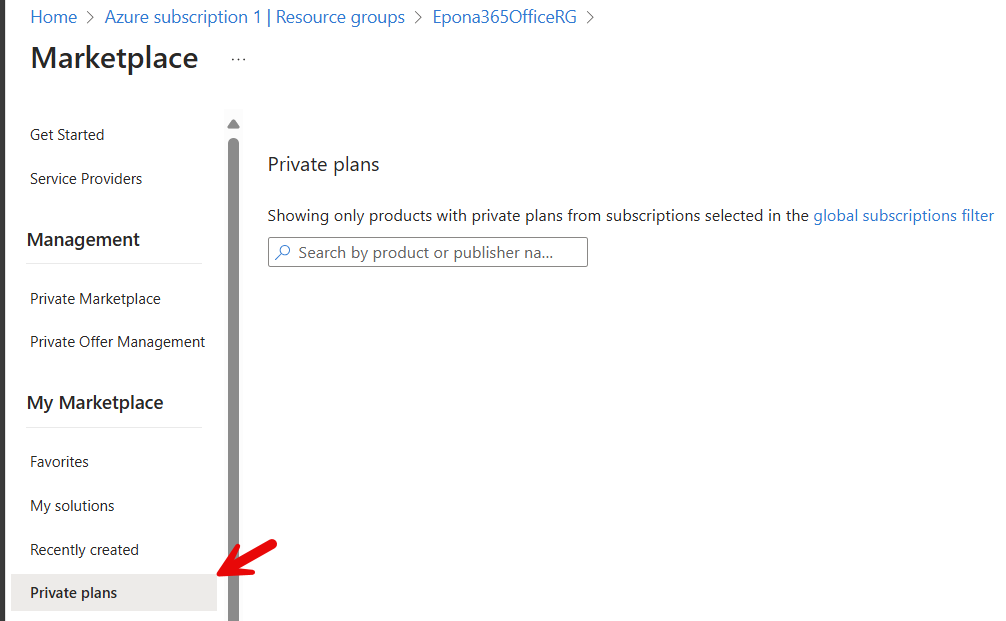
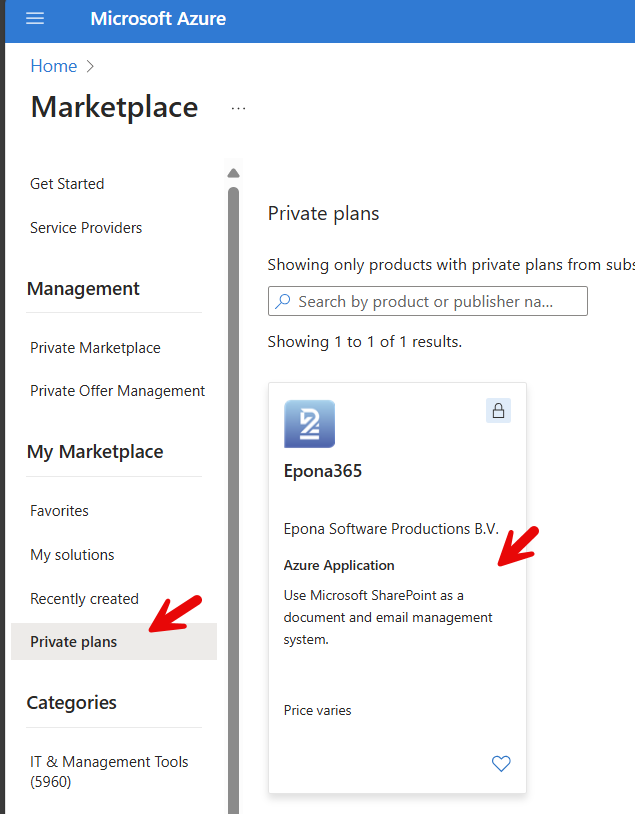
Under My Marketplace, click Private plans to review the private plans offered to this subscription. In the example below, no Epona365 Office private plan is available. This could be caused because Epona did not yet receive or process the Azure Subscription ID that you are using for this deployment. The private plan in the Azure marketplace is only available to known Azure Subscription IDs. Please connect with helpdesk@epona.com to request access to the Private plan.
The Azure Subscription ID can be found on the Overview page of the subscription
It could take up to one hour before a Private plan is available after updating the Azure marketplace with the supplied Subscription ID
Choose the Epona365 Private plan
Select the Version to deploy, here only 25.1 is available and click Create

Remark in some cases your organization might have policies in place that prohibit the deployment to create VNET (Azure VLANs), NSGs (Network Security Groups) or a different naming convention for the Application Insights resource, please consult Epona to gain access to the Epona365 25.1 Advanced installed, which will let you select the VNET, NSG (PublicIP/InternalIP options) and App Insights.
# Create Epona365 25.1 Choices
Select the Subscription and Resource group, select the Region (preferable identical to the Azure Subscription region) and enter the Prefix for the resource names. This prefix is placed before the names of the resources that are to be created, the prefix is limited to 3 to 5 characters and can only include lower case letters and number. The prefix needs to be globally unique, so do not use ep365, as we have probably already taken this prefix.
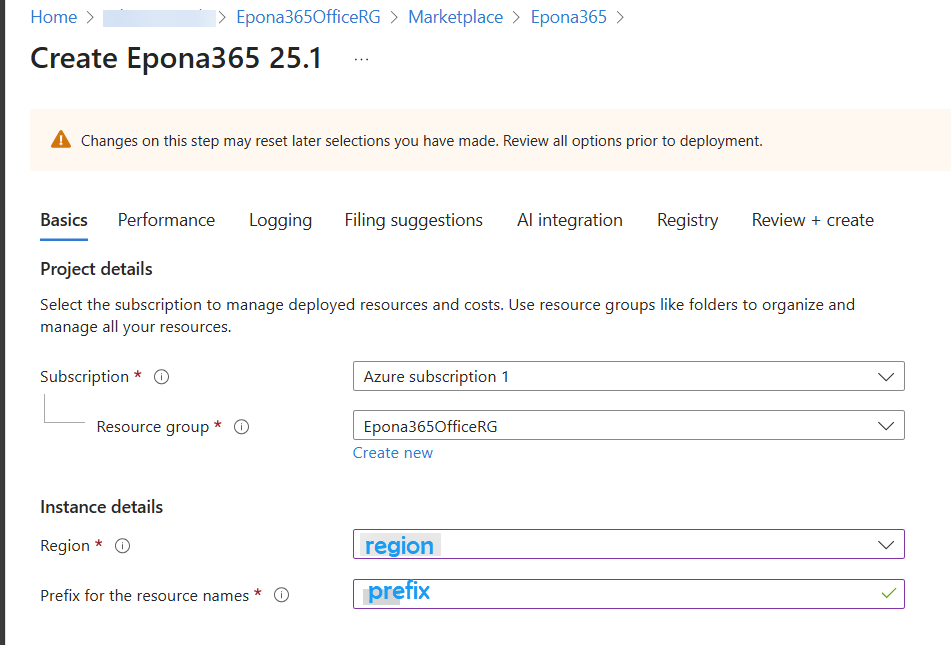
Remark: per Februari 2026 there is a new requirement to chunk the VNET up into two Subnets. Deployments done before Feb 2026 are Legacy deployments with a single subnet, they will continue to work. When upgrading an existing pre feb 2026 environment check the Legacy box, if deploying a new environment, then keep it unchecked

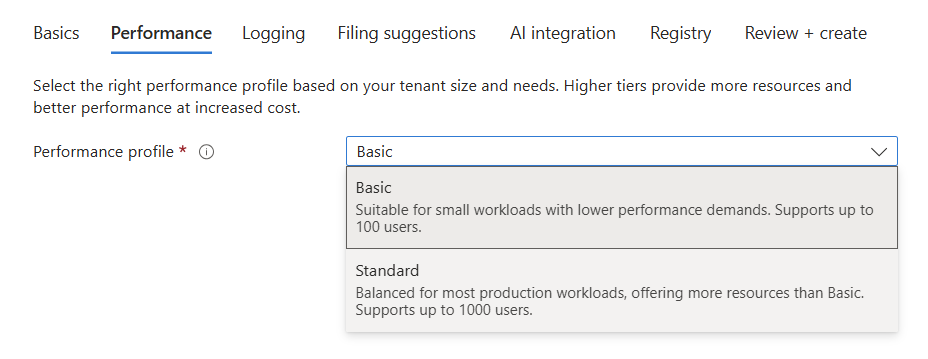
- Click Next and select Basic or Standard performance parameters. Basic is suites for up to 100 users and Standard is suited for 1000+ users. Choose Basic for small Proof of Concept deployments. You can allway redeploy with this changed performance setting.
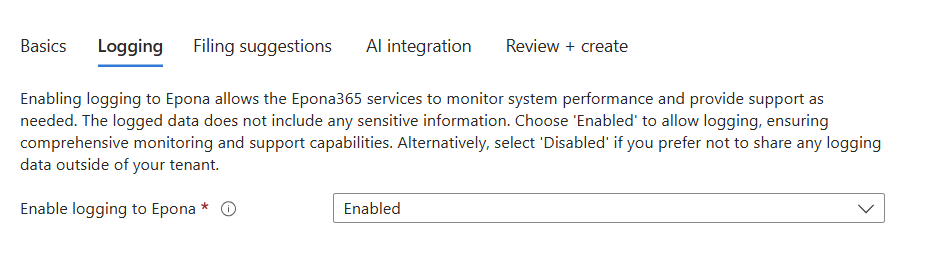
- Click Next and Enable or Disable Logging. This setting allows Epona to receive logging from your application with a 30 minute delay and would help us proactively connect with you should an error occur. No information about documents or contents of documents is shared.
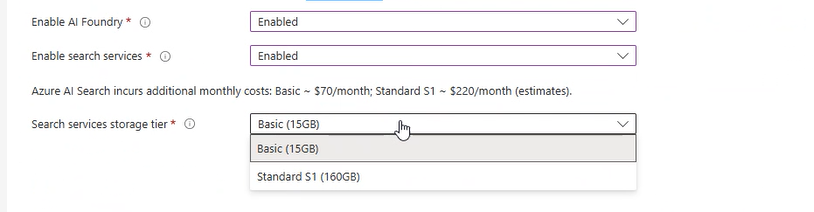
- Click Next and Enable or Disable AI Foundry and Search services. AI Foundry is used by AskEpona AI services. It will receive and process AI prompts and is used to store AI Conversations/Sessions. The AI Search service is an Azure RAG search resource. Search services are scaled based on the size of the semantic index stored. This is a step to discuss with your Epona consultant, it requires post configuration steps.
Important: if you already have deployed Search and Cognitive services in previous deployment, then realize that you have to manually Enable that choice if you redeploy. The Azure Marketplace deployment is unaware of previous choices you have made. So check the services selected, use the same regions and choices. And check your deployment documentation for any other choices you previously made.
- Click Next and Enable or Disable Filing Suggestions. Filing Suggestions are not immediatly active should you enable them, in this stage the necessary Azure resources are deployed to be able to use Filing suggestions. Filing suggestions allow Epona365 Office to suggest a possible filing location based on E-mail metadata (To, From, Subject). This correlated filing requires a small database to store filings patterns.

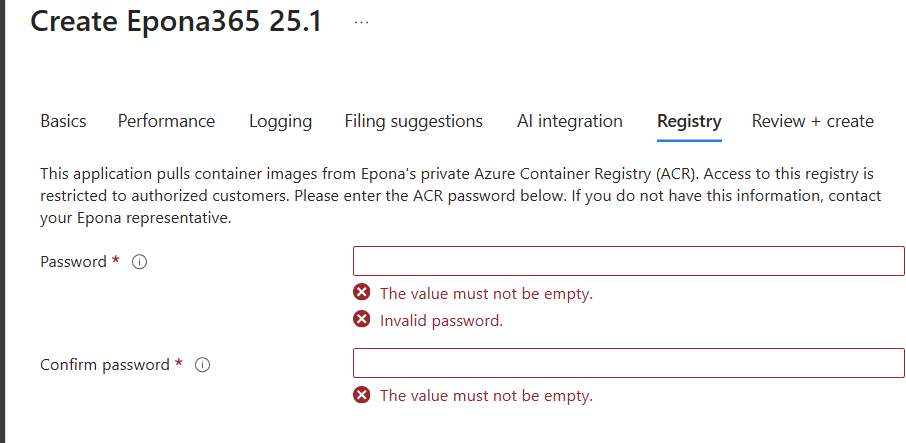
- Click Next and enter the password to retrieve new containers from the Azure Container Registry at Epona. This password will be sent to you when Epona has opened the Azure Marketplace Private plan for your Azure subscription
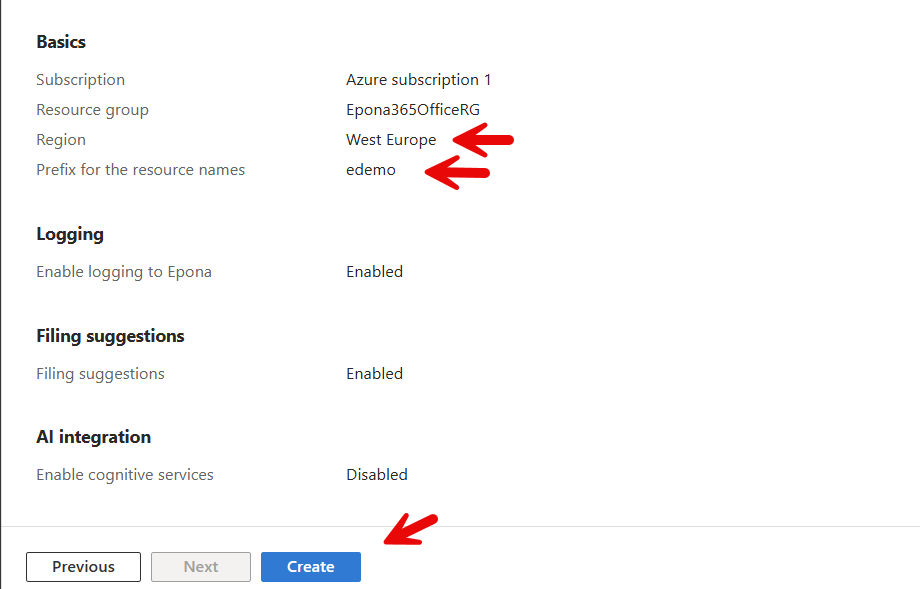
- Click Next to Review the choices. Document the Prefix and Region used. If you redeploy the resources from the marketplace using the same mix of Region and Prefix, you will be able to overwrite the current deployment. Should you choose a different Prefix or Region, then duplicate resources will be deployed.
The deployment is now in progress. The azure resources are placed in the Resource group you have created. Microsoft will also create a seperate resource group with a number of epona635 Office related resources outside of the resource group you selected for the deployment.
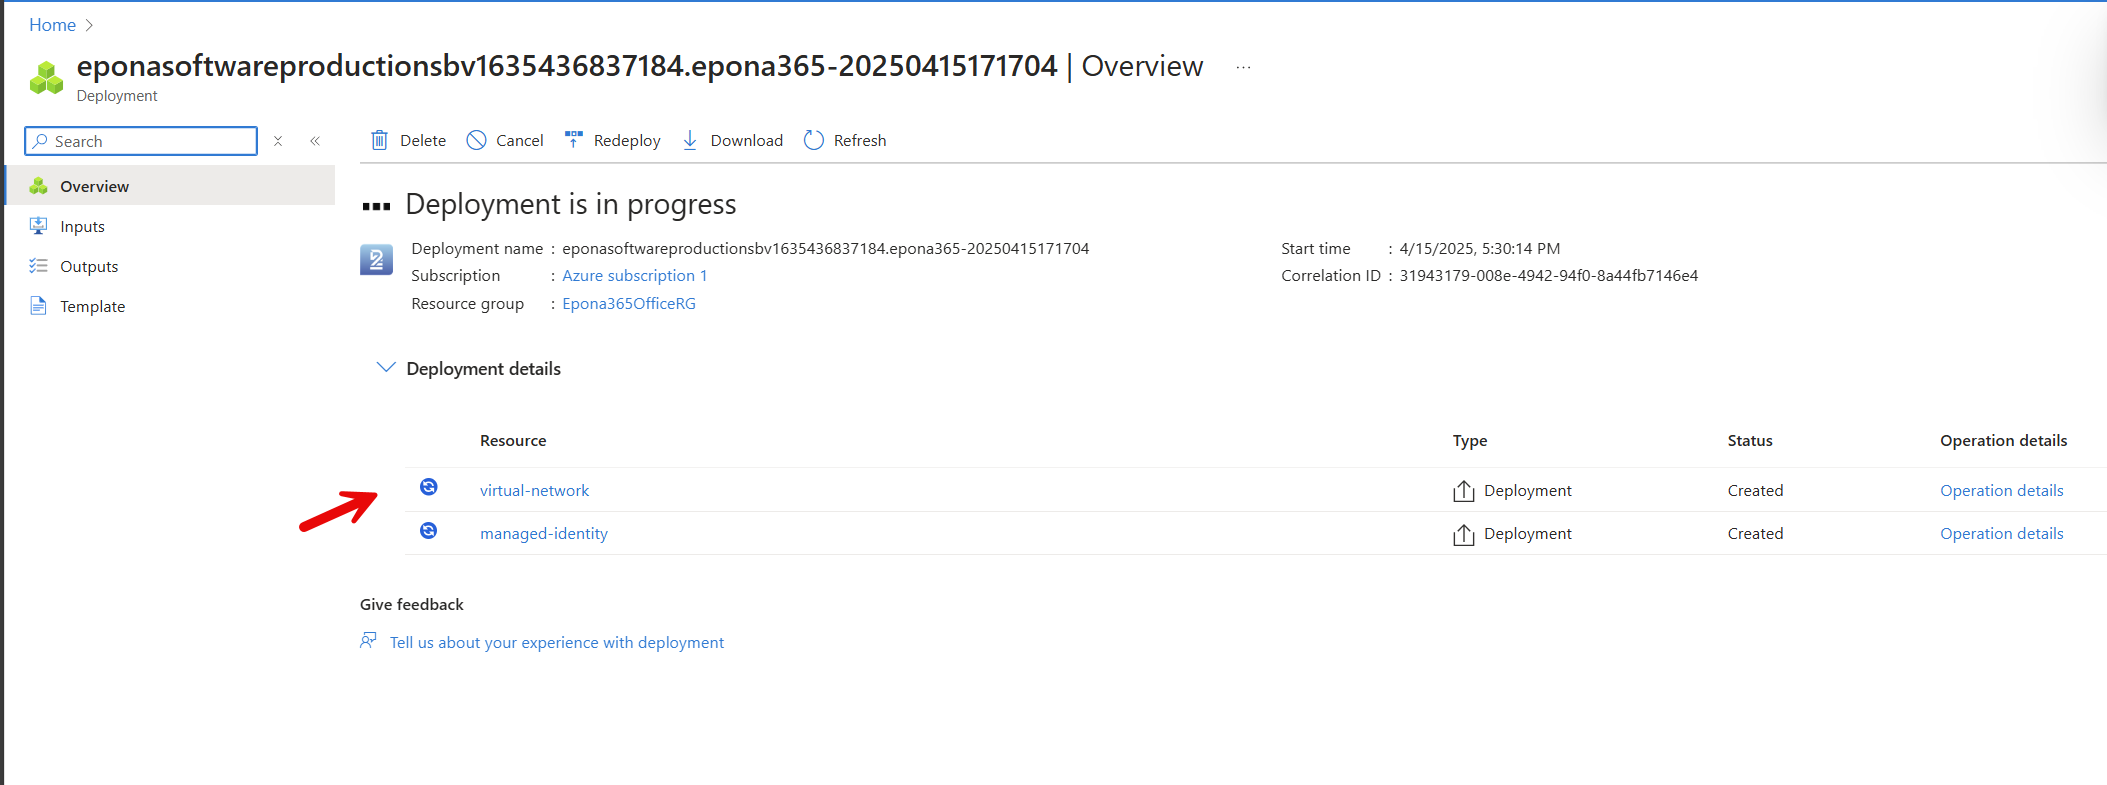
It might take up to 45 minutes for all the resource to deploy initially. Please wait for this deployment to finish before proceeding.
Monitor the progress and outcome of the resource creation, the deployment should run without errors, but in some cases certain Azure resources could be not unavailable in a selected Region, especially the Azure Search and Cognitive services. We advise to rerun the deployment (click Create, select from the Marketplace, use the same Prefix and Region).
Remark: when you deploy an Azure Container Environment in a Resource group, there is going to be an extra Resource group that is created by Microsoft to manage the loadbalancer, the external IP address and the inbound traffic. This way Microsoft Azure is able to monitor the availability and warn you if containers are no longer available.

# /Setup installation steps from the ep-web container
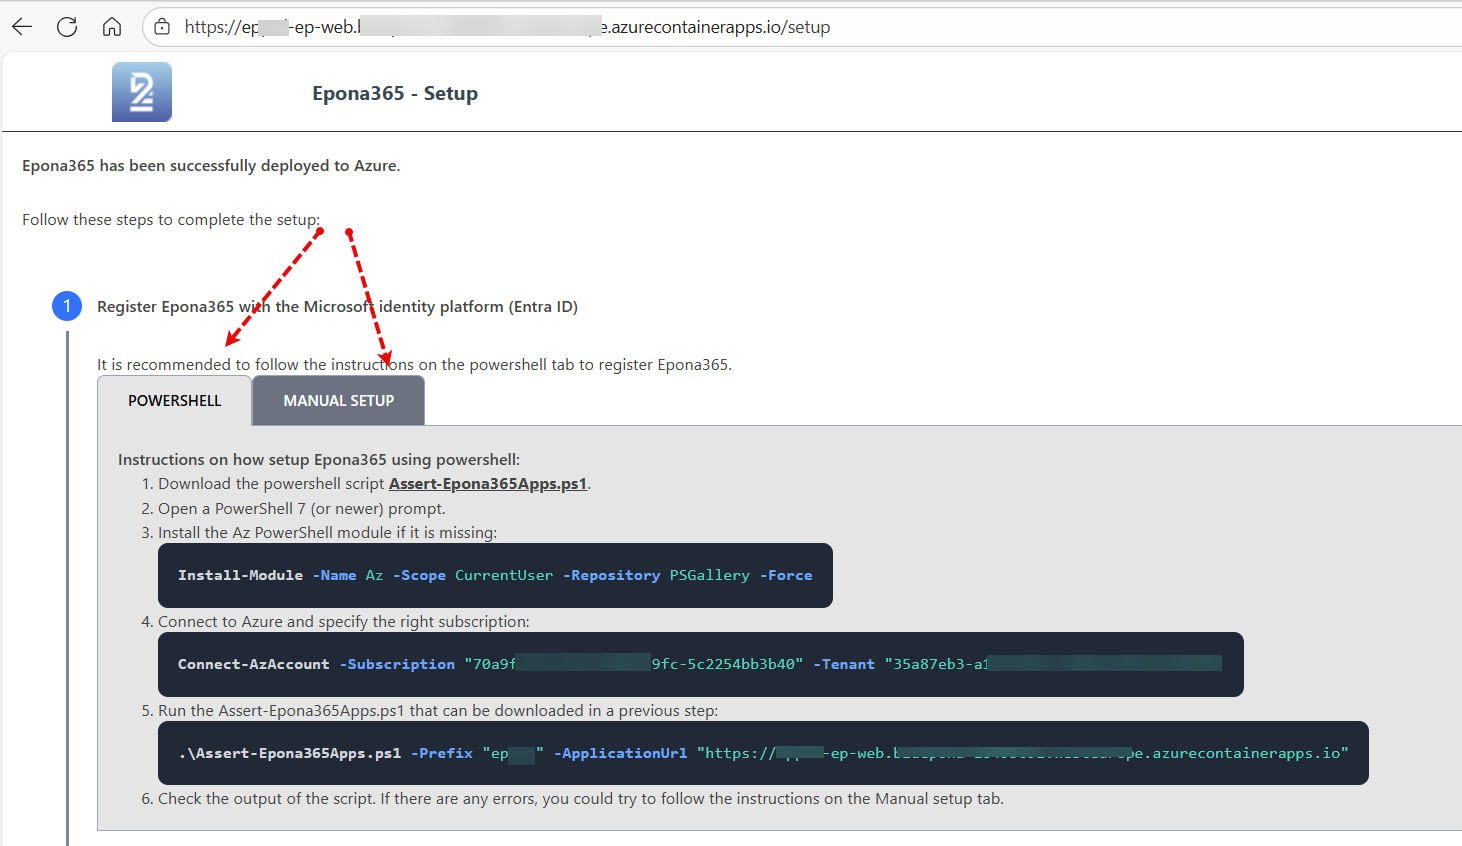
The deployment of the containers and other resources to the Epona365Office RG resource group in the Azure Subscription is finished, but the containers cannot reach Microsoft 365 resources such as SharePoint online or Graph unless an EntraID APP is created that provides the containers or the (delegated) users of the system access to these resources. This process of creating two APPs with the right permissions is complex, therefore a PowerShell script can be used to create the APPs and connect the APPs to the containers. If your organisation does not allow Powershell scripts to be run, then you can perform the manual steps outlined in the ep-web Container on the /setup page.
# Using Powershell to deploy the two Epona365 Office Entra ID apps
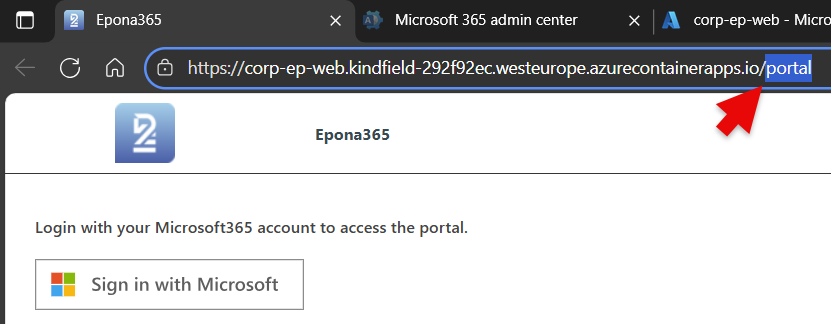
- Click on the Application URL (or Ingress) in the Overview page of the ep-web container

- The browser will open a new Tab and show the /portal page of the ep-web container. At this stage the containers (resources) are deployed, but there are no APPs with permissions into the Microsoft environment, hence the /portal will not yet be able to retrieve data. Therefore the first step is to replace /portal with /setup
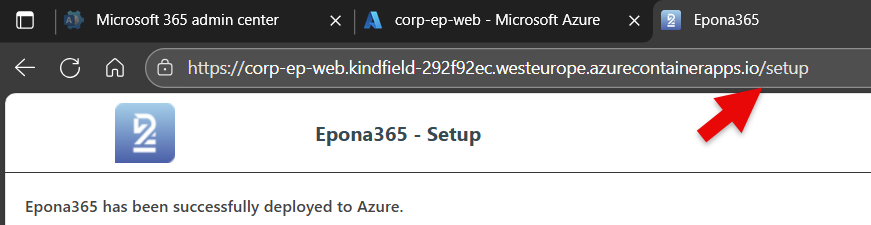
- Choose step 1: Register Epona365 with the Microsoft identity platform (Entra ID), two choices are presented, using Powershell to setup the two Entra ID APPs or Manual steps

First the Powershell method is documented. There are a number of preconditions to meet: 1. The user needs permissions to create two APPs in Entra 2. The user needs to consent to API-permissions defined for the two APPs in Entra 3. The users workstation needs to use Powershell 7 and above on a Windows platform (because of the certificate download phase) 4. The users workstation need the PowerShell Az module to run the powershell script provided 5. The users workstation needs to enter the public IPv4 address used by the workstation in the networking configuration of one of the resources
- Click on task 1.1, Download the powershell script Assert-Epona365Apps.ps1

- The download of a script file is possibly blocked by the Browser, for Edge click Keep to save the file to the default download location
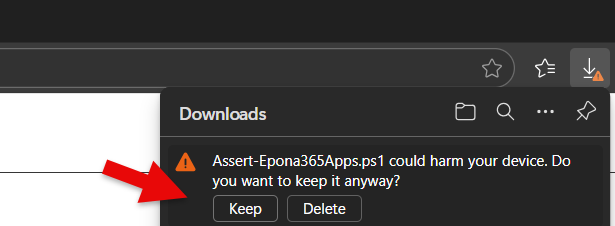
- Rightclick on the *.ps1 file and choose Properties, Unblock the file in it is blocked by the download from an Internet location. Move the PS1 file to a temporary location so that it is easier to reach than the Download folder which has spaces in the folder name.

Remark: filestreams blocking will also block the Powershell execution of the script
# Login to Azure using Powershell
- Visit the {prefix}-ep-web container and lookup the Application (Ingress) URL on the right top corner

By default you are redirected to the /portal page, but you need the Connection information from the /setup page, so replace /portal with /setup
Copy the Connect to Azure instruction under step 4, this instruction you can use to connect PowerShell 7 to the Azure subscription used on this Tenant
eg. Connect-AzAccount -Subscription "ffd2cd94-647d-1234-a471-abcd1cb0655a" -Tenant "29619c40-02a5-1234-be03-abcd49dd99"
Login using the Azure credentials used deploying the Epona365 Office solution, this is usually an account that is the owner of the Azure subscription
Install the Az Powershell module: Install-Module -Name Az -Scope CurrentUser -Repository PSGallery -Force
Remark: it might take up to 15 minutes before a Module is downloaded and applied. the Az module could possibly also conflict with other modules running on your machine
- Now that you have logged into Azure and have installed the Az module, the next step is to execute the Powershell script. Before you execute the script, you need to be aware that
- The script will create two Entra ID APPs, does your username have permissions to create APPs?
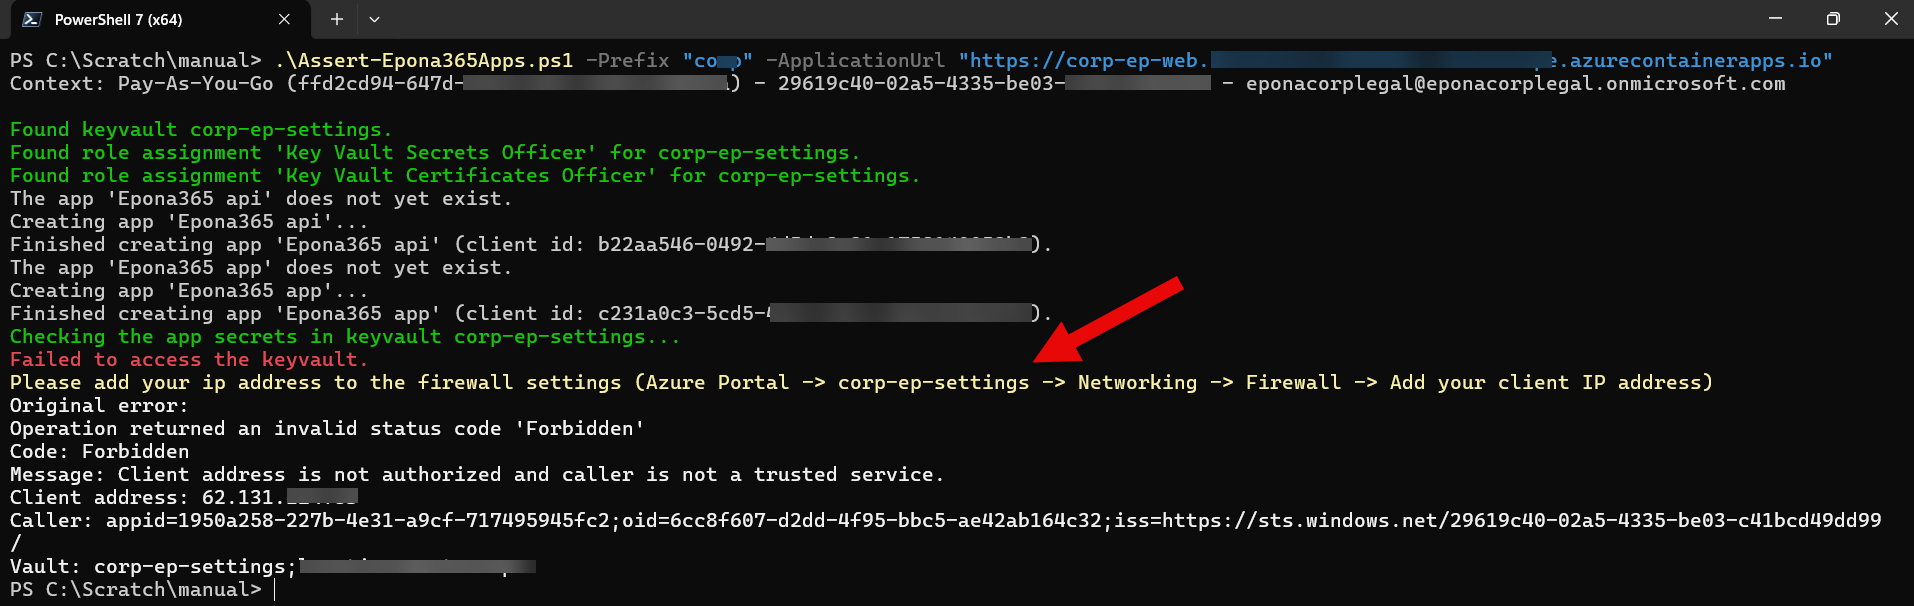
- The script will download and upload information to the VLAN protected netwerk of Epona365 Office from your workstation, you need to open the firewall to run a script from your workstation against the Epona365 Office environment
- Go to the Epona365Office Resource Group and select the {prefix}-ep-settings Keyvault
- Choose Objects, Networking and under the section Firewall, click Add your client IP address to allow your workstation to run Powershell against the Keyvault
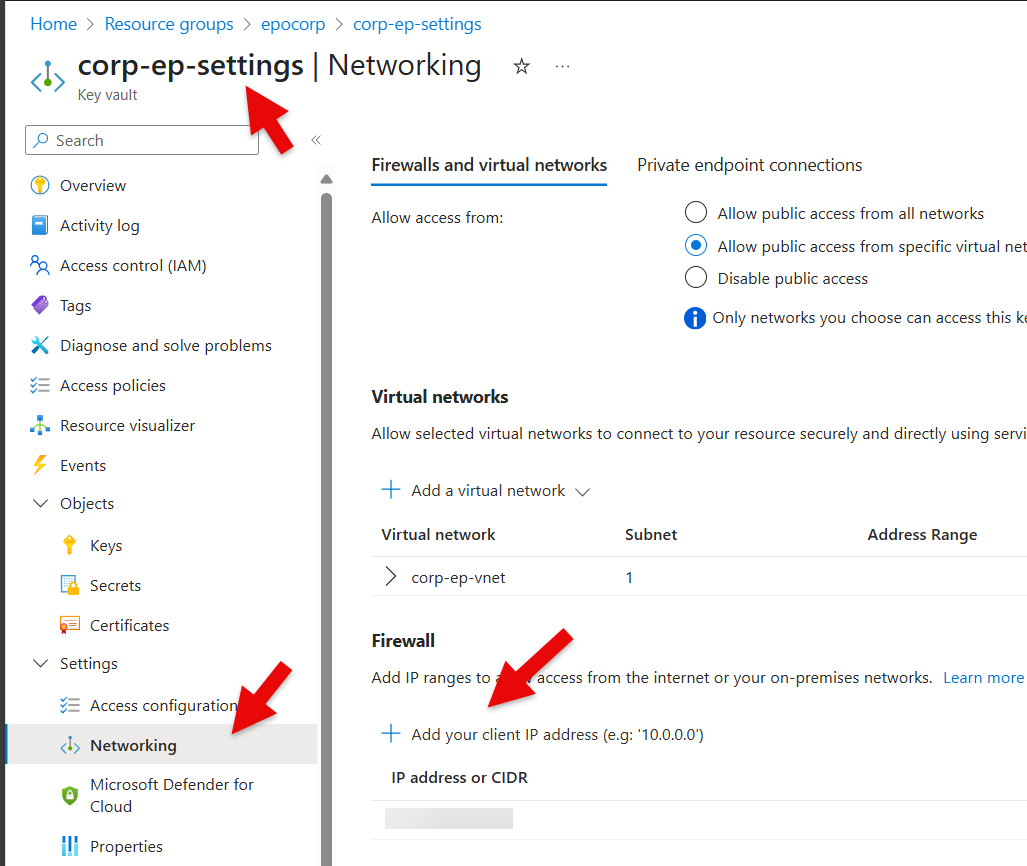
How do you know your Public IP address? Visit a site like WhatsMyIP or https://ip.intermax.nl (opens new window) to retrieve your IPv4 address
Add the IPv4 address, and click Apply. It will take Azure a couple of minutes to process this request. Click Refresh to see if Azure placed /32 behind the address that you entered, this confirms that Azure has processed the change
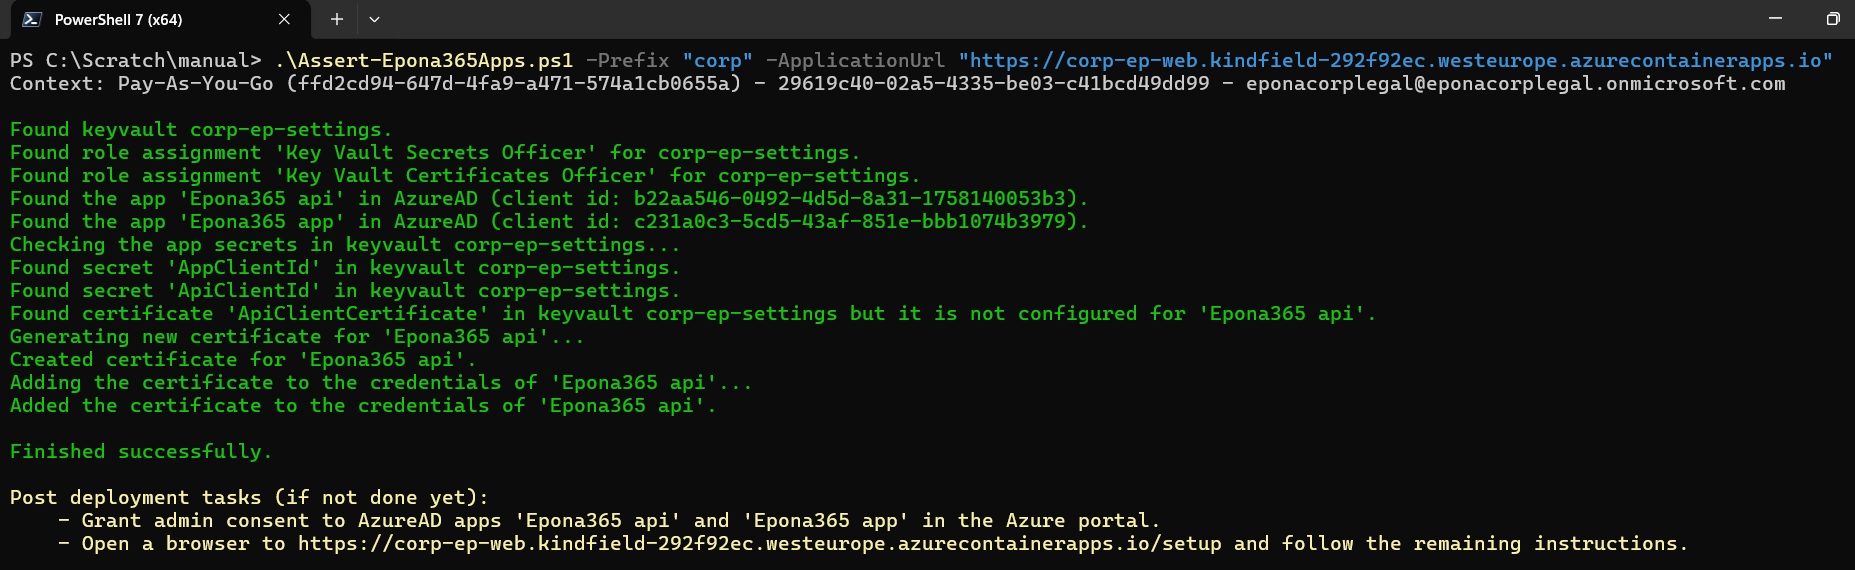
Start the Powershell script using the instructions in step 1.5
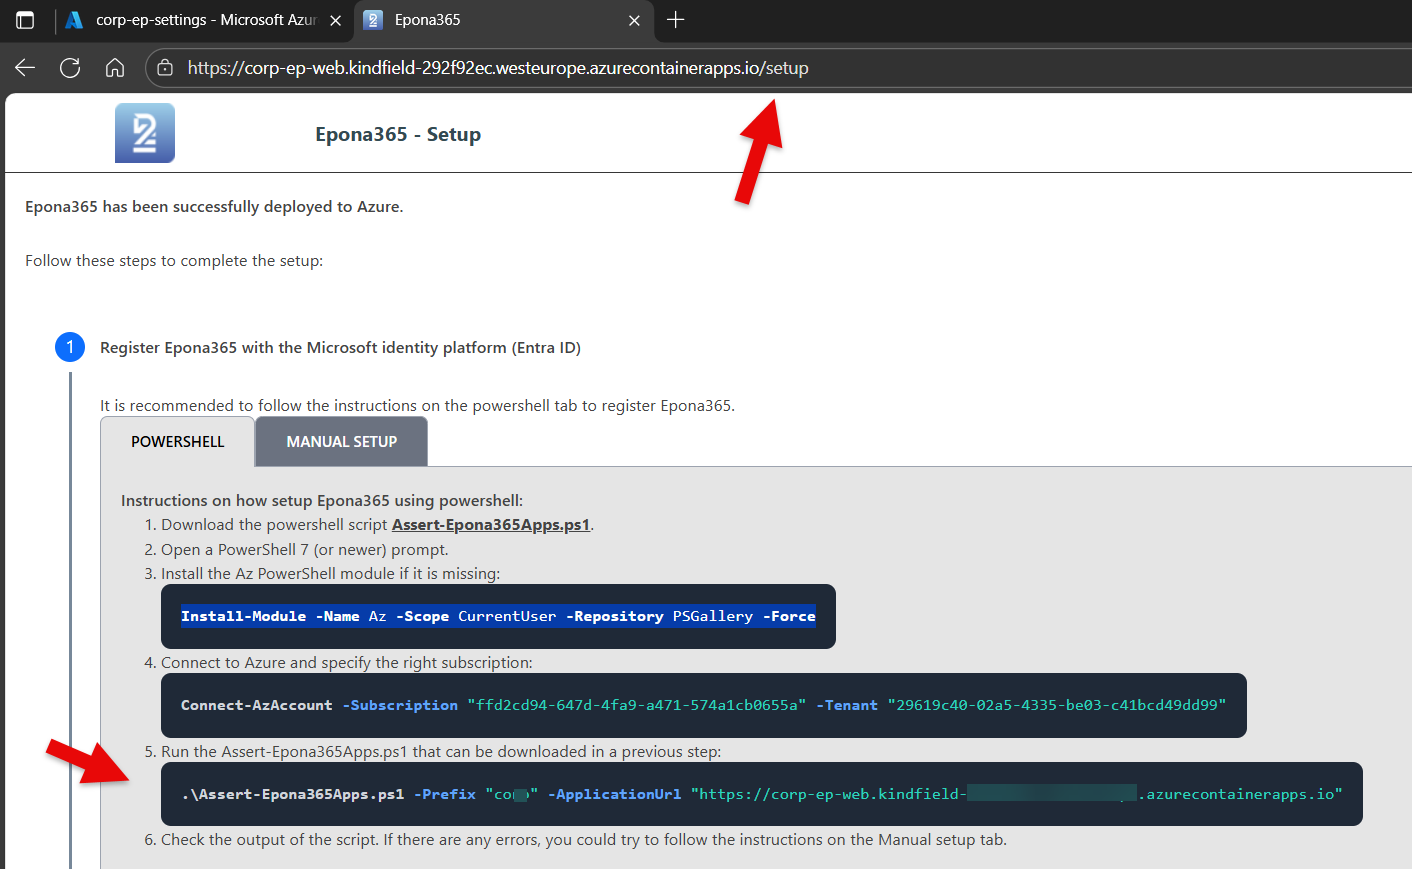
Example: .\Assert-Epona365Apps.ps1 -Prefix "{prefix}" -ApplicationUrl "https://{prefix}-ep-web.kindfield-abc123zw.{region}.azurecontainerapps.io"

Remark the Powershell script will create two Epona365 Entra ID apps. Should you want to use a different naming convention for the entra ID apps, please use: .\Assert-Epona365Apps.ps1 -Prefix "{yourprefix}" -ApplicationUrl "https://{yourhostinazure}.azurecontainerapps.io" -ApiAppName "Epona365 API ({yourname)" -SpaAppName "Epona365 APP ({yourname})" In case the user running the Powershell script can only create the Entra APPs, but has no permissions in the Azure subscription, consider using the -OnlyEntraId parameter, which would run the Entra creation part only. A number of post script execution steps are required afterwards.
If the execution of the script is OK, the green text output in Powershell is visible and two remaining tasks are displayed in yellow
Remark: when you have now allowed the workstation running the Powershell script Firewall access to the Epona365 Office {prefix}-ep-settings, then you will see a firewall warning during the execution of the script
Warning: if you see an error during the Create a certificate phase of the Powershell script execution, this is most likely due to the Operating System you might be using. Powershell on an Apple Mac computer does not allow this powershell action of creating and downloading a certificate
# Grant consent
Two new Entra ID APPs have been added. The APPs have API-permissions, but these permissions are not active unless the Global Admin Consents the API permissions
- In the Azure portal, go to Entra ID, select App registrations (not Enterprise applications), filter on All applications
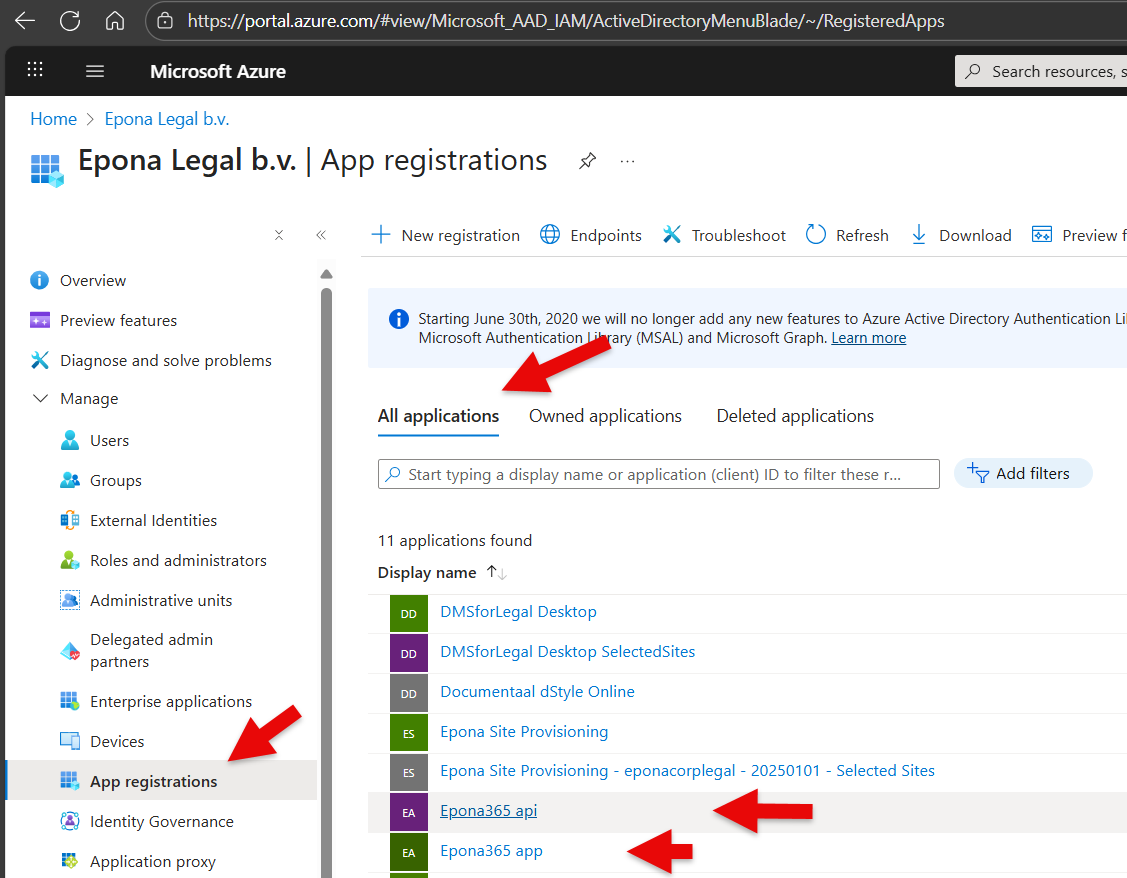
- There are two new Applications available, Epona365 api and Epona365 app. First consent the Epona365 api APP
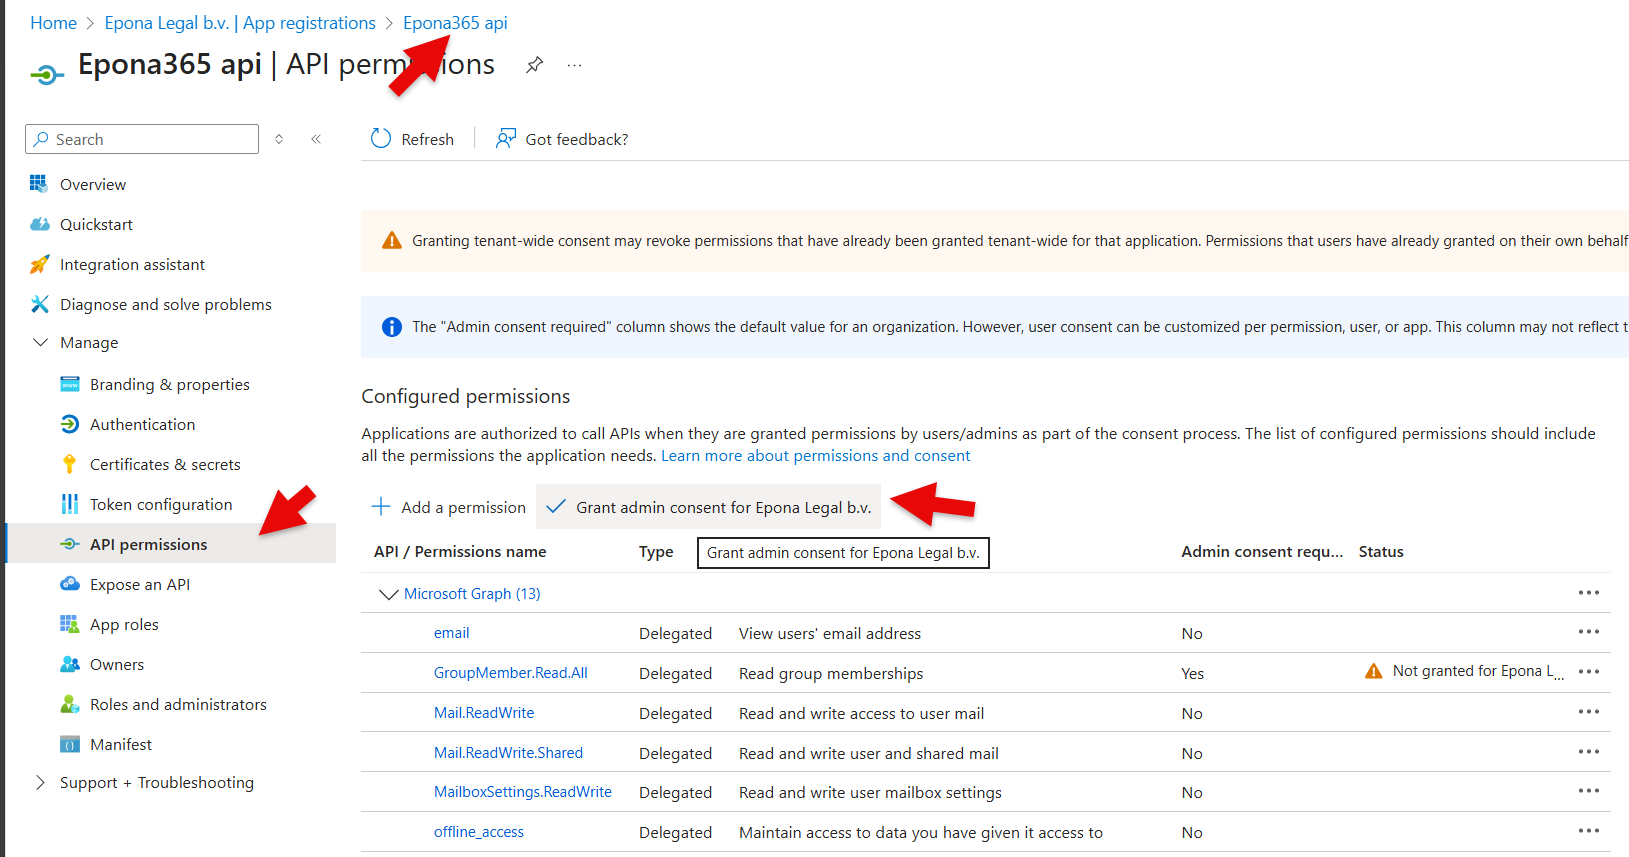
- Click Manage, API permissions and Grant admin consent for {username of the global admin}
- Now visit Epona365 APP and repeat the steps
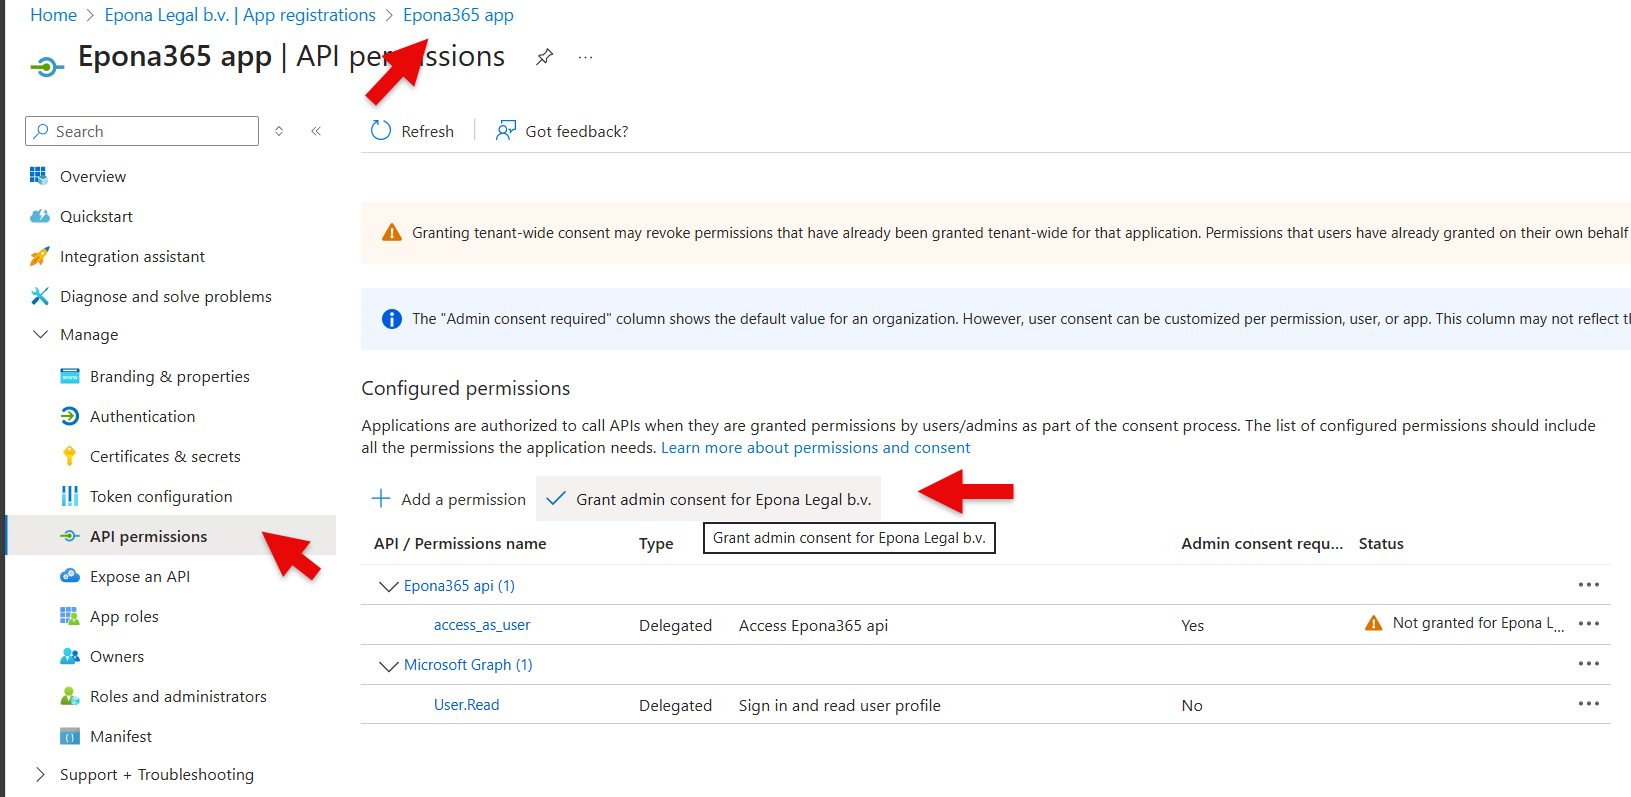
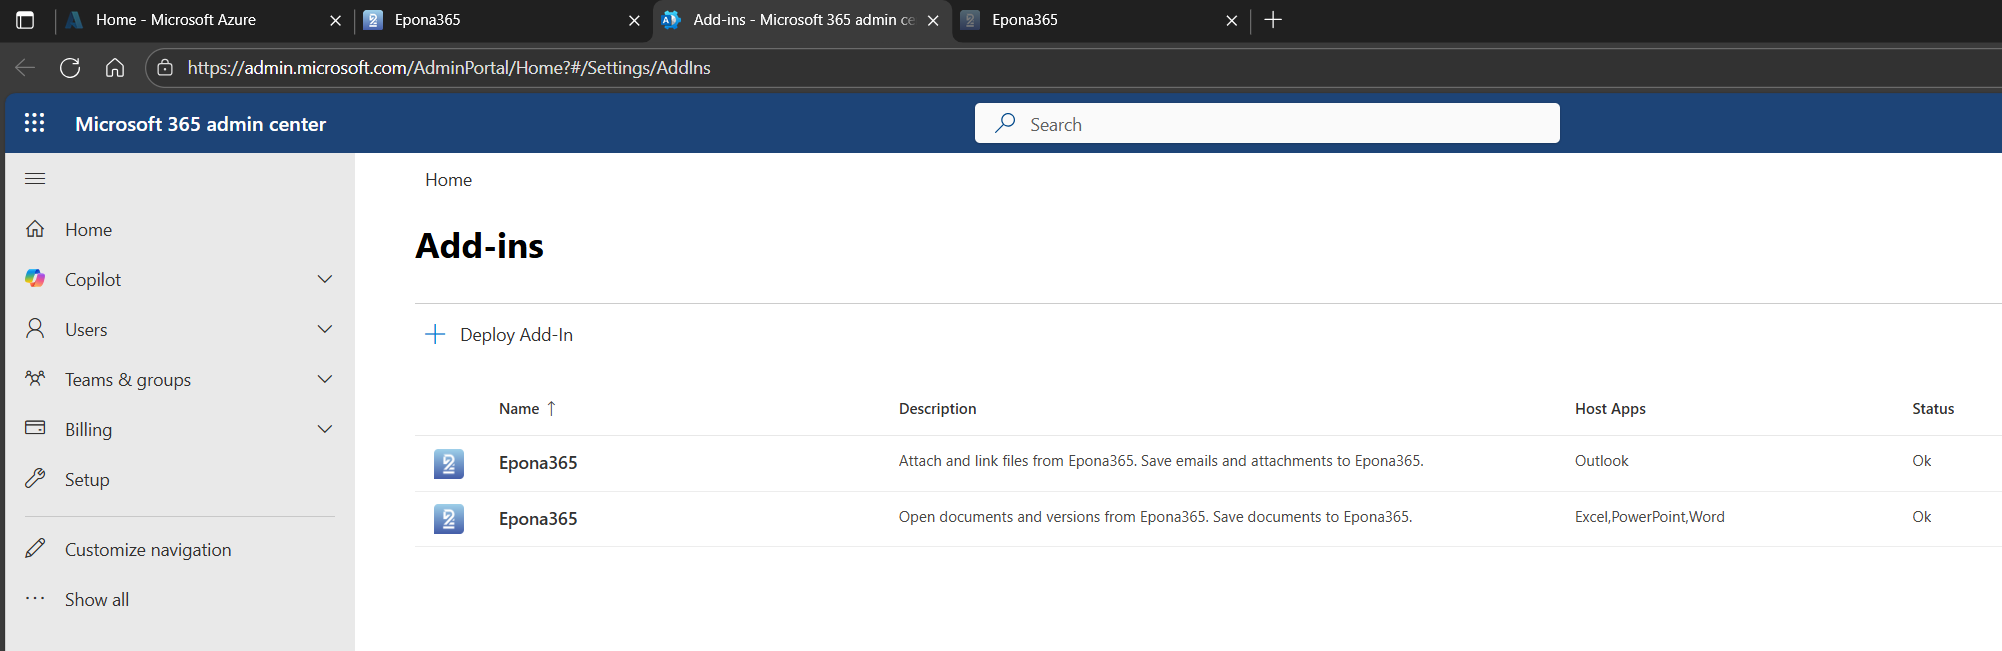
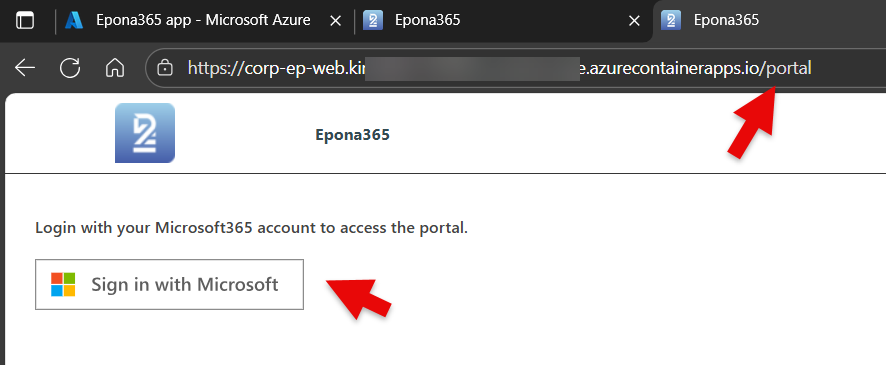
The Azure (container) resources will now have access to the Microsoft 365 resources. This can be verified by visiting the /portal page of the web container
- Go to the {prefix}-ep-web container, click on the Application URL and sign into the /portal page
# Manual Entra APP creation
If your organization does not allow the running of a PowerShell script to create the two Epona365 API and Epona365 APP Entra ID Registered Apps, the Epona365 Office /setup website offers you manual steps to create the APPs and connect the certificates to the keyvault. These steps are very specific, we strongly advise to use the powershell script.
# Choose Manual Setup
Remark: the below steps are based on Epona365 Office 25.1.124 and could be updated in later versions, please use the steps defined in the /setup website
- Sign in to the Azure portal.
- Search for and select Azure Entra ID.
- Select App registrations > New registration.
- Set the name to Epona365 api.
- Set the account type to Accounts in this organizational directory only.
- Don't enter anything for Redirect URI.
- Select Register to complete the initial app registration.
- Select Token configuration, select Add groups claim. Check the box for Directory roles. Leave ID, Access, SAML on Group ID.
- Select Add.
- Select API permissions, select Add a permission > Microsoft Graph > Delegated permissions.
- Search for and select the following delegated permissions:
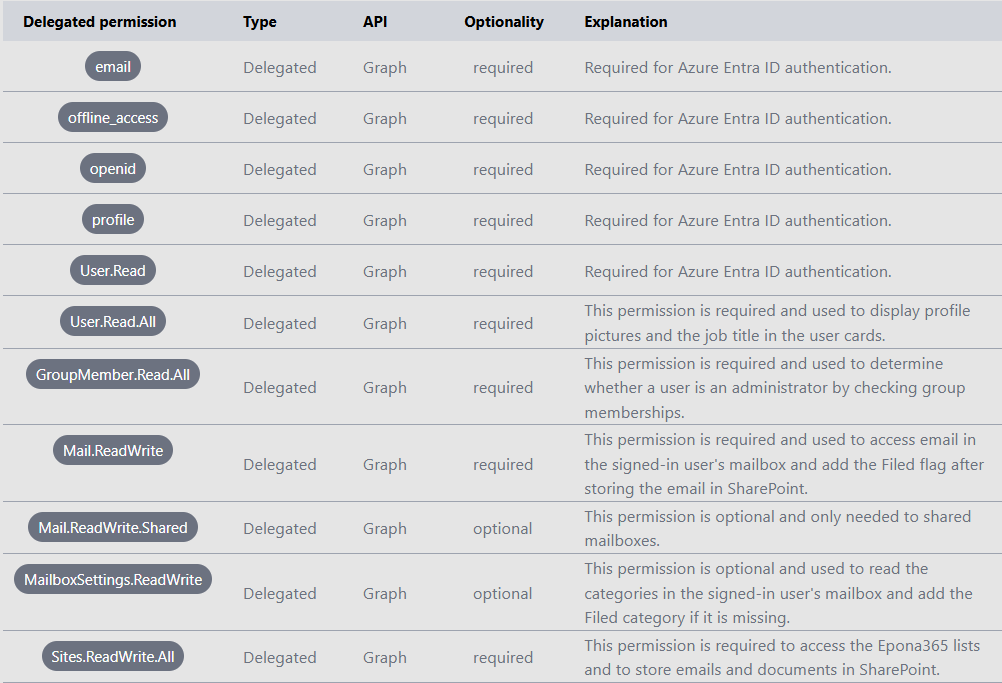
- Select Add permissions.
- Select API permissions, select Add a permission > Graph or SharePoint > Application permissions.
- Search for and select the following application permissions:
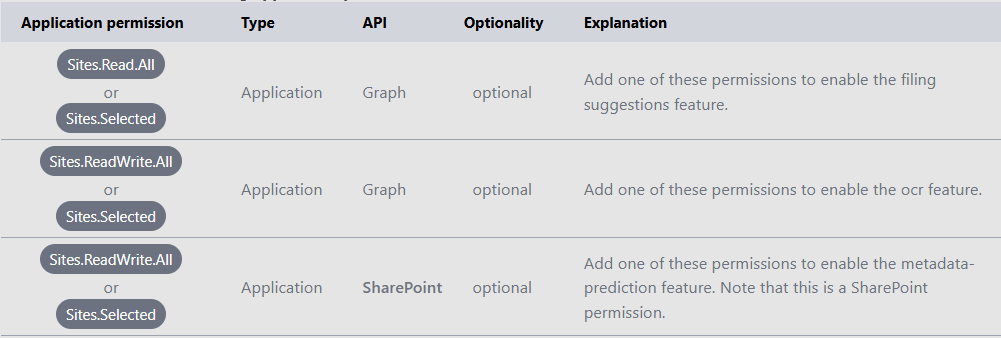
- Select Add permissions.
- Select Grant Admin consent and select Yes.
- Select Expose an API.
- Select Set next to Application ID URI and change the Application ID URI to include the domain name: api://{prefix}-ep-web.xyz.region.azurecontainerapps.io/{application-id}.
- Select Add a scope.
- Set the Scope name to access_as_user.
- Set Who can consent to Admins only.
- Set the Admin consent display name to Access Epona365 api.
- Set the Admin consent description to Allows the app to access the Epona365 api as the signed-in user.
- Set the User consent display name to Access Epona365 api.
- Set the User consent description to Allows the app to access the Epona365 api on your behalf.
- Set the Admin consent display name to Access Epona365 api.
- Select Add scope.
- Select Add a client application.
Enter the following guids to pre-authorize all Microsoft Office application endpoints:
ea5a67f6-b6f3-4338-b240-c655ddc3cc8e (All Microsoft Office application endpoints)
d3590ed6-52b3-4102-aeff-aad2292ab01c (Microsoft Office)
93d53678-613d-4013-afc1-62e9e444a0a5 (Office on the web)
bc59ab01-8403-45c6-8796-ac3ef710b3e3 (Outlook on the web)
Set the Client ID to the respective guid in the panel that opens and check the box for api://{prefix}-ep-web.xyz.region.azurecontainerapps.io/{application-id}/access_as_user.
Select Manifest.
Find the property accessTokenAcceptedVersion and replace the value null with 2.
Configure an app registration for the office addins to access the web api:
- Sign in to the Azure portal.
- Search for and select Azure Entra ID.
- Select App registrations > New registration.
- Set the name to Epona365 app.
- Set the account type to Accounts in this organizational directory only.
- Under Redirect URI, select Single-page application (SPA) and set the uri to https://{prefix}-ep-web.xyz.region.azurecontainerapps.io/portal.
- Select Register to complete the initial app registration.
- Select Authentication.
- Select Add URI under the Single-page applications.
- Set the new uri to brk-multihub://https://{prefix}-ep-web.xyz.region.azurecontainerapps.io.
- Select Save.
- Select API permissions. Keep the existing User.Read permission.
- Select Add a permission > APIs my organization uses > Epona365 api.
- Select the access_as_user permission and then Add permissions.
- Select Grant admin consent and select Yes.
# Store the app settings in an Azure Keyvault
- Sign in to the Azure portal.
- Select the resource group that contains the Epona365 resources.
- Select keyvault {prefix}-ep-settings.
- Select Access control (IAM) > Add role assignment > Key Vault Secrets Officer > Next.
- Select Select members and add yourself. This role assignment may be removed after the secrets are added in the next step.
- Select Secrets.
- Use Generate/Import to add these secrets:
Name: AppClientId Value: The client id of the Epona365 App Name: ApiClientId Value: The client id of the Epona365 Api
- Select Access control (IAM) > Add role assignment > Key Vault Certificates Officer > Next.
- Select Select members and add yourself. This role assignment may be removed after the certificate is added in the next step.
- Select Certificates
- Use Generate/Import to add this certificate:
Certificate name: ApiClientCertificate Subject: CN=epona365 Validity Period (in months): 24 (or any period you prefer) Lifetime Action Type: E-mail all contacts (or any other option you prefer)
- Select Create.
- Select certificate ApiClientCertificate.
- Select the current version.
- Select Download in CER format.
# Add the certificate to the Epona365 api app
- Sign in to the Azure portal.
- Search for and select Azure Entra ID.
- Select App registrations.
- Search for the Epona365 api app and select it.
- Select Certificates & secrets > Certificates.
- Select Upload certificate and upload the .cer file that was downloaded from the keyvault.
- Add a description.
- Select Add.
- Delete the certificate from you local computer.
- Make sure to generate and upload a new certificate before the current certificate expires.
# Resolving /portal login problems
If the Entra ID APPs have not been properly installed or no API permissions are assigned and granted, you will see the error below
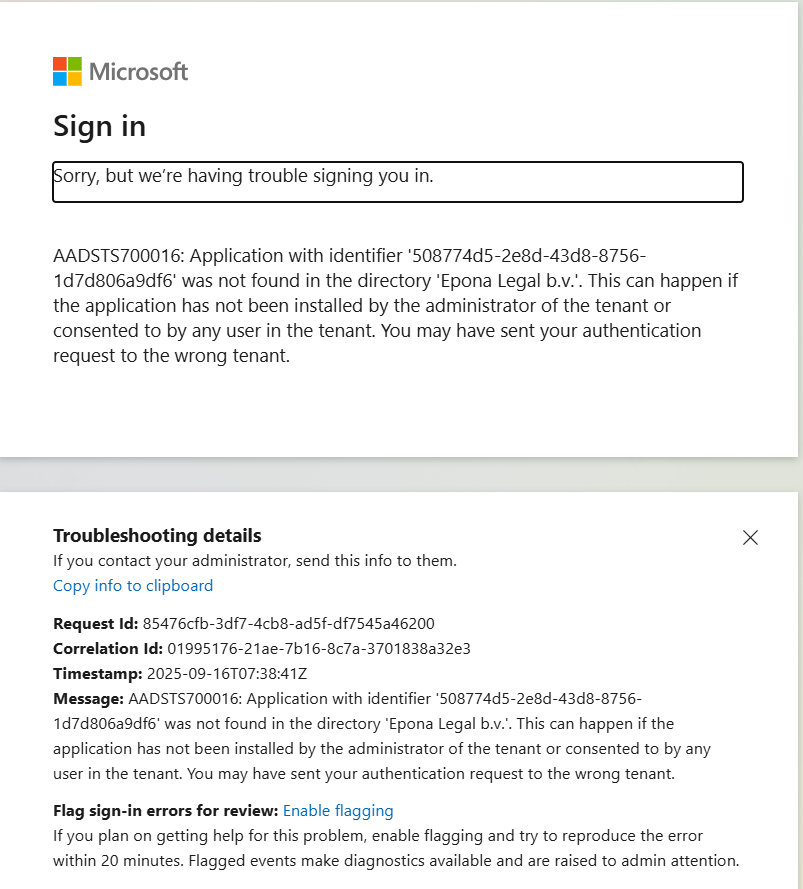
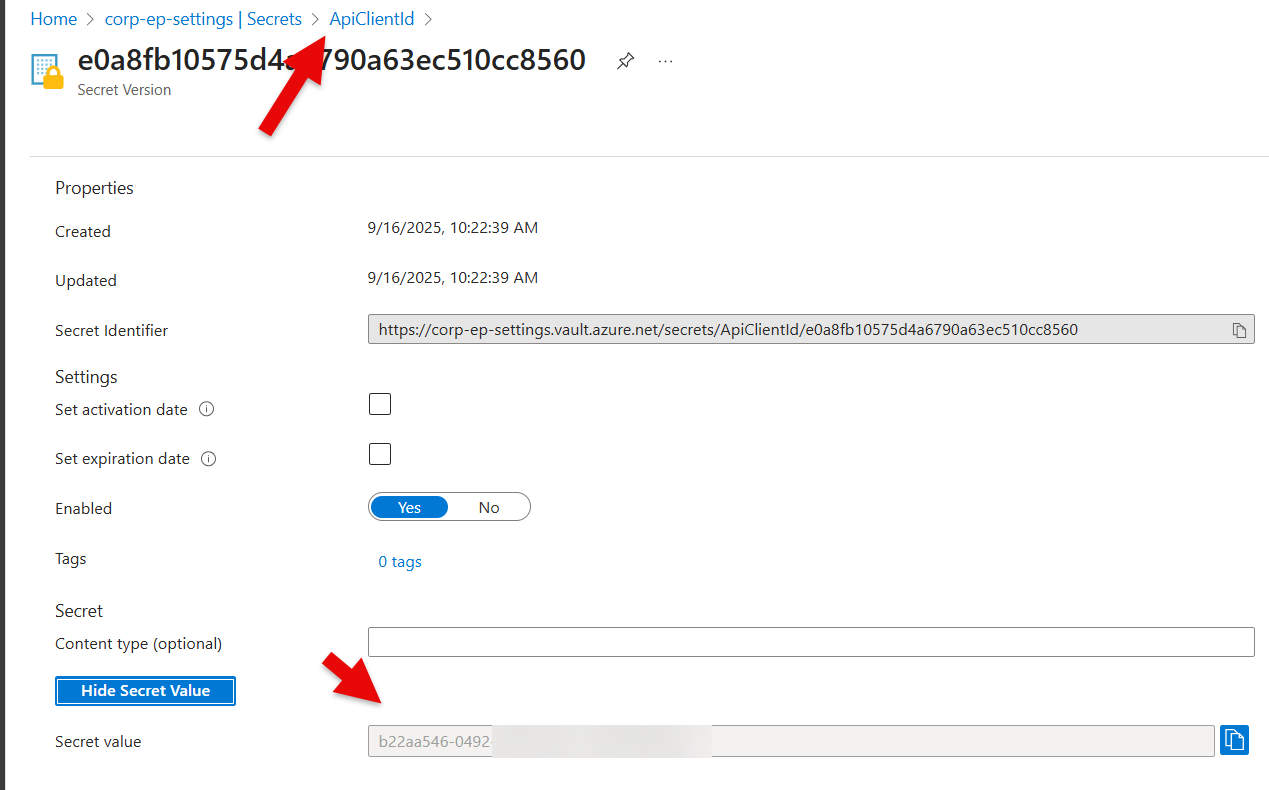
Remark: if you redo a deployment and overwrite the Epona365 API and APP apps in Entra ID, then the {prefix}-ep-settings, Secret value is not alligned with the Application (Client) IDs of the newly created APPs. Visit https://{yourwebcontainerURL}/api/configuration to check the APP and API Application (client) ID that is in use. If you change the Secret, then the web container needs to be restarted. Please also be aware that APP ID's are registered in Manifest files. Update Manifest files if your have replaced the Entra ID apps. The Entra ID APP relationship is registered in the {prefix}-ep-settings container, Secrets section.
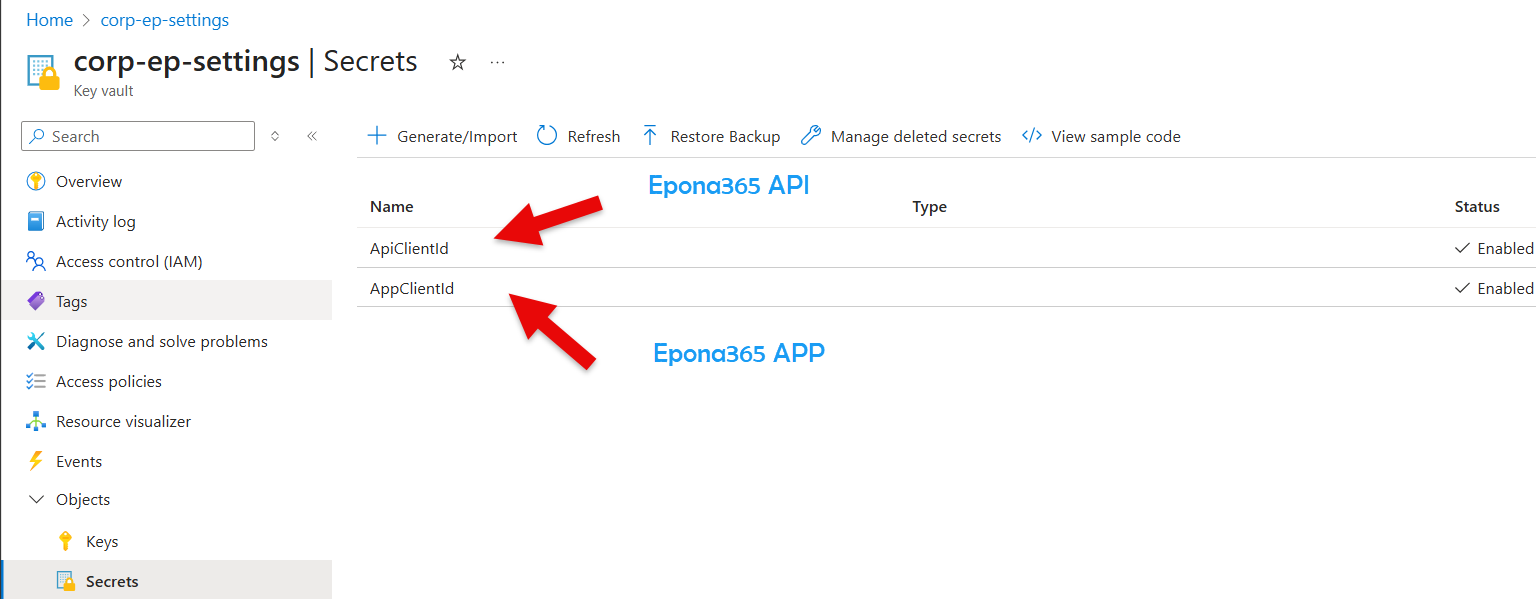

You can create a New version of a secret and save the Application (client) ID in the Secret field
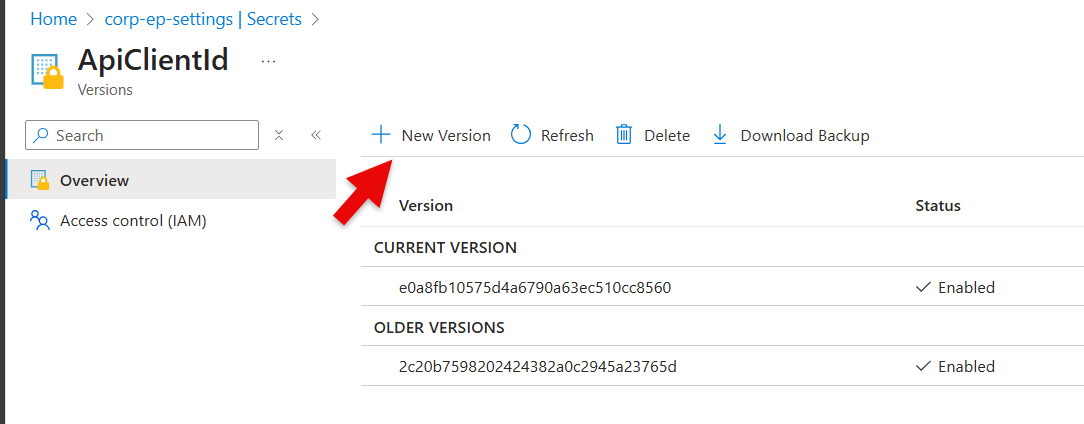
If you unhide the Secret, then you are able to check if the ID in ep-settings alligns with the Application (client) ID in Entra

# Setting the SharePoint URL
The Global Administrator is able to access the /setup and /portal page. You can configure a Non Global Admin security group consisting of a number of users to have access to the /portal. But by default only the Global Admin can reach the /portal
The SharePoint URL where the Epona365 (DMSforLegal) is deployed need to be defined. The /portal settings will be registered in that location. This means that the Global Admin needs access to the location where the Matters, My Matters and other Epona lists reside.
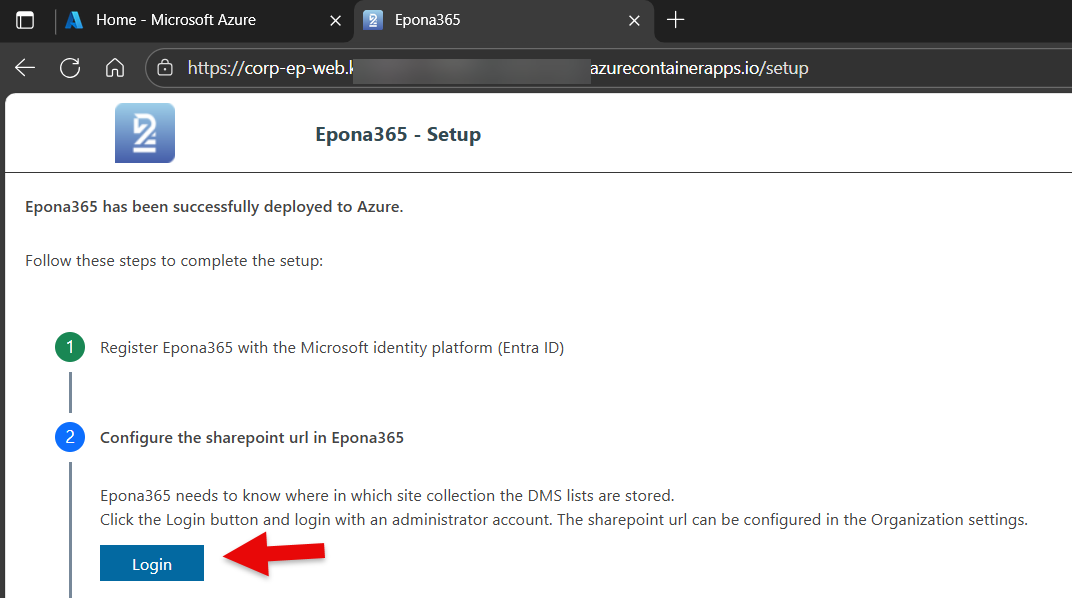
- Click on Step 2 in the /Setup page, choose Login to the portal and enter the URL of the Epona site collection that contains the management lists (Matters, etc)
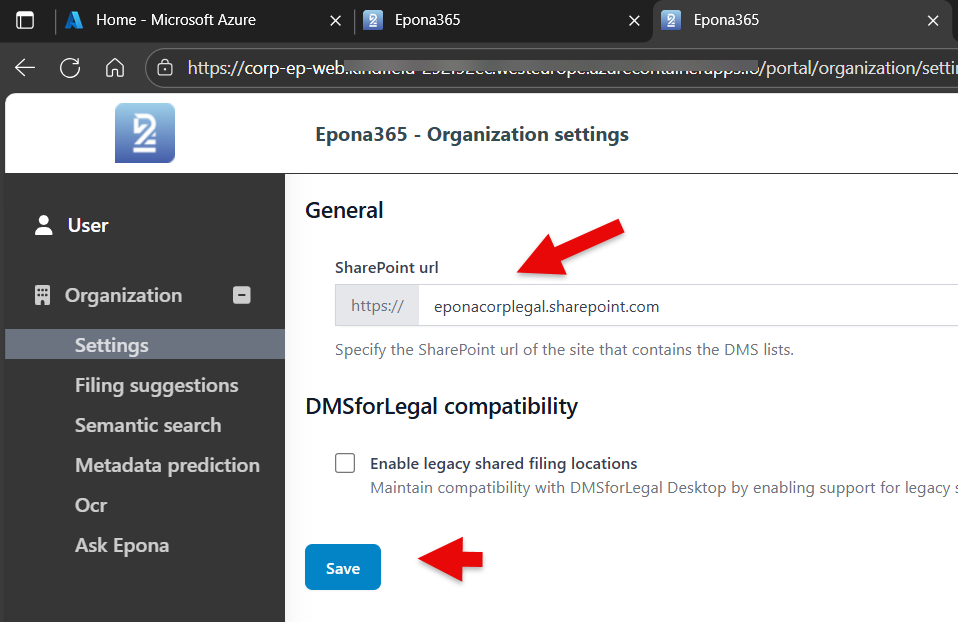
- Click Save to save the URL and notice that the /portal now displays new functionalities.
More options in the /portal page are now visible, as the Epona365 Office solution is able to read the DMS Configuration list in the Epona Site Collection.
# Finishing /setup, deploy the Manifest files of Outlook and Office to Microsoft 365
The last steps in the deployment of Epona365 Office involves deploying the Manifest files to Microsoft 365. This is again a task that can only be performed by a Global Administrator or a role that is allowed to deploy apps in Microsoft 365. The Manifest files used by Epona are XML based. There will also be a JSON based manifest file soon that would work for both Outlook and Office, but in this case we deploy two seperate Manifest files, one for Outlook and the other one for Office
Remark: it would be advisable to ask Epona to update your Epona365 Office to a recente 'channel' or version of the environment. Versions above 25.1.107 offer Outlook SmartAlerts instead of a Send & File dialog. If you see the below options, then your are running an old version 25.1.39
Warning: when using nested groups (groups with groups as member) Modern Add-ins will not appear, see Microsoft Learn page (opens new window)

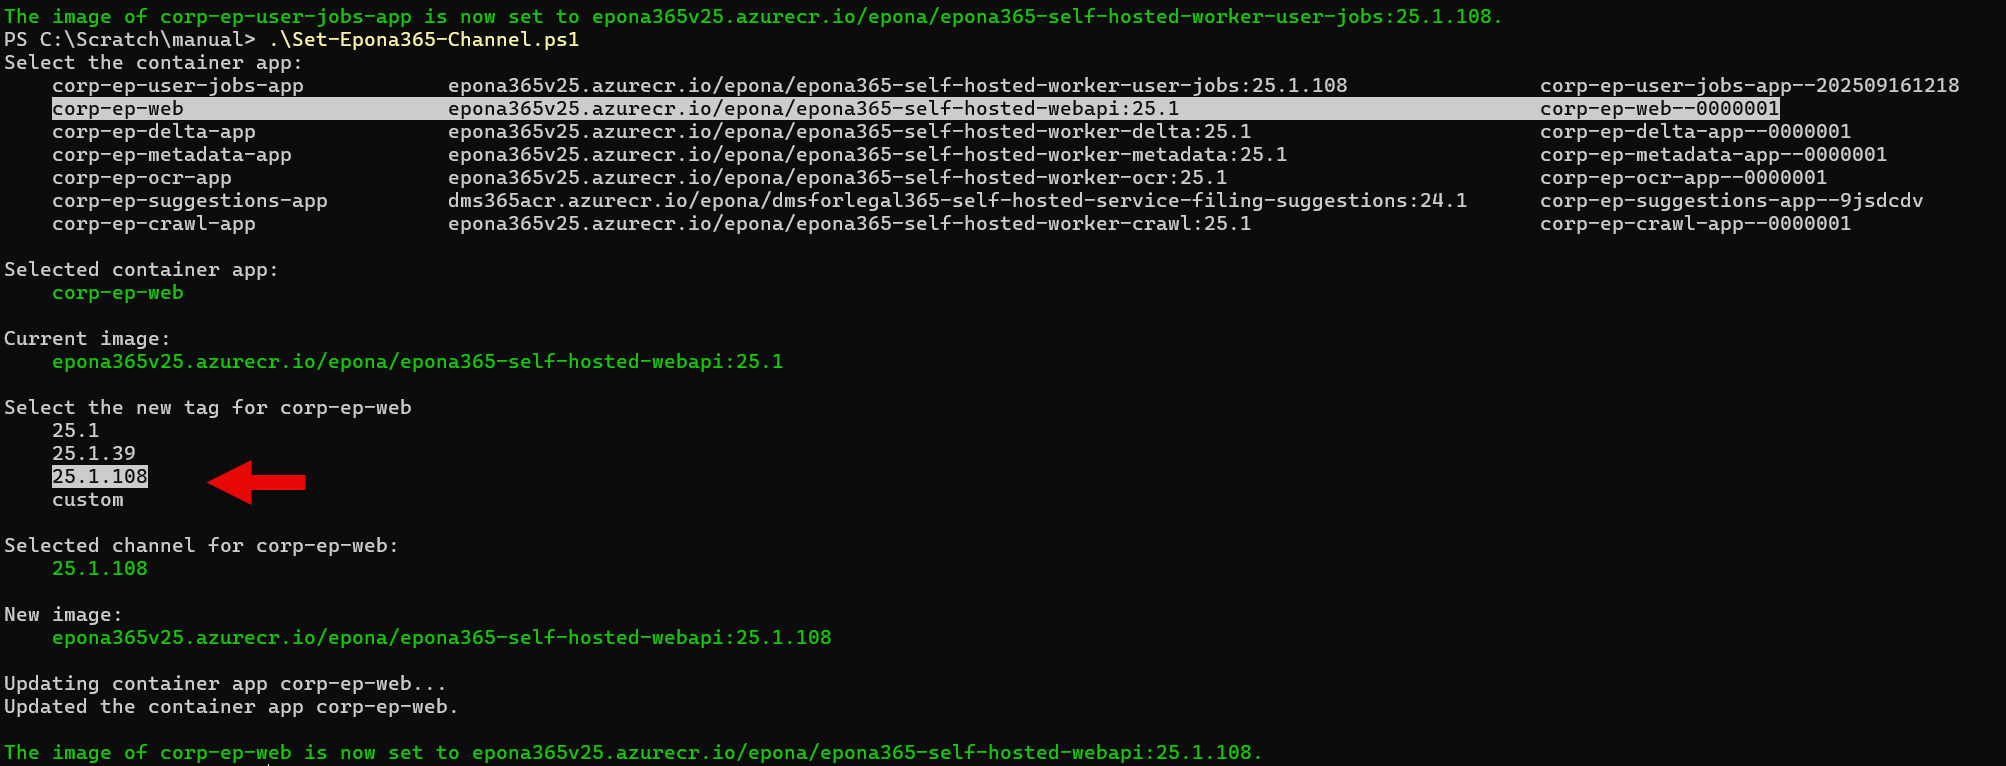
- Use the Set-Epona365-Channel script to set the Epona365 Office environment to 25.1.108 or above.

Remark: there is seperate documentation available on how to set Channels
Wait a few minutes and check if the /setup page now displays the SmartAlerts Outlook choice
Follow the instructions to push both the Outlook and the Office Manifest files to the right (AD) user group. The Outlook manifest file is available in two flavours, SmartAlerts and Send & File. We very strongly advise you to select the default option SmartAlerts. This feature will not block Outlooks' ability to Send e-mails if there is anything wrong with the Azure environment. The Office manifest file offers a choice of deploying the CTRL+O and CTRL+S shortcut keys in the Modern Add-in. Please check the version of Word that you have deployment before you make choice.

Remark: do not choose Admin and required pushing of APPs, if there is a technical problem, you will not be able to remove APPs quickly enough.