
# Installation
Currently the URL column in the matterlist should contain an url pointing to a document library (not a site/sitecollection). Multi doclib design is not supported.
# Requirements
ClientCode
The Client:Code column should exist in the Matters list.

The Client:Code column should be added to the managed property DMSClientCode manually if not created via DMS Config tool.

MatterName
The MatterName column should exist in the Matters list. Add the matter name value to the column via the filehandlers matterslist.xlsx.
# App Catalog Installation
The webpart can be deployed as a tenant wide solution or single site collection. Tenant admin permissions are required to install and deploy the app to the tenant. If only site collection administrator permissions are available, install and deploy the webpart to a single sitecolletion.
# Tenant App Catalog Installation
Follow these steps to install the EponaDMS365 webpart solution as a tenant wide solution. Tenant admin permissions are required.
Install the package (sppkg) into the Sharepoint AppCatalog
Open the App Catalog Admin page (opens new window) in the browser and click on App Catalog.
To create a new AppCatalog site open the Tenant AppCatalog configuration (opens new window).
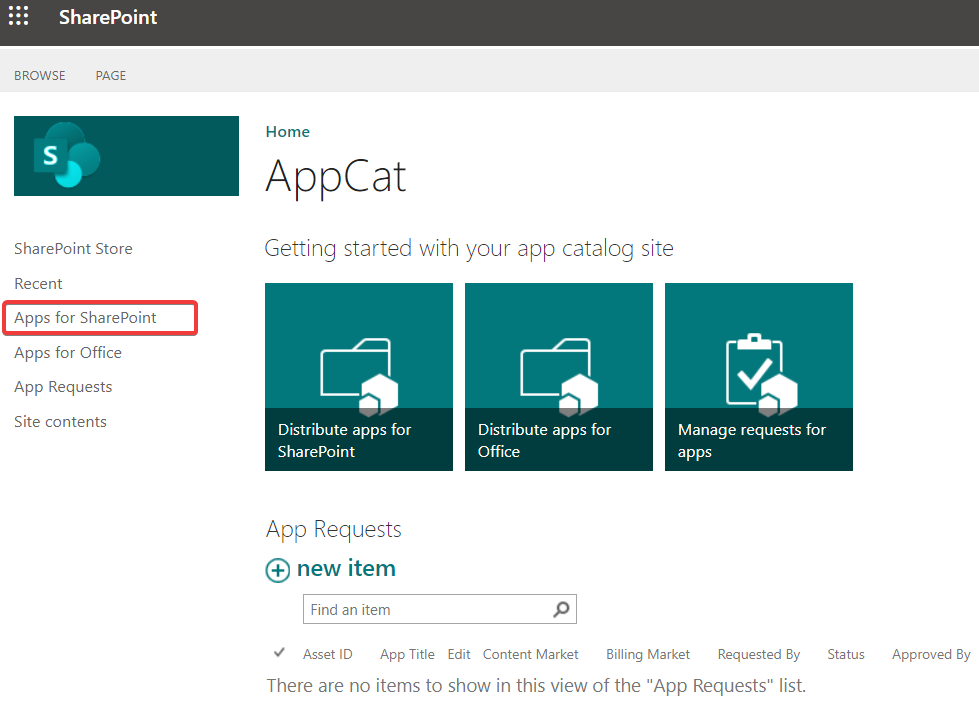
Select Apps for Sharepoint and drag/drop the file EponaDMS365.sppkg into the list.
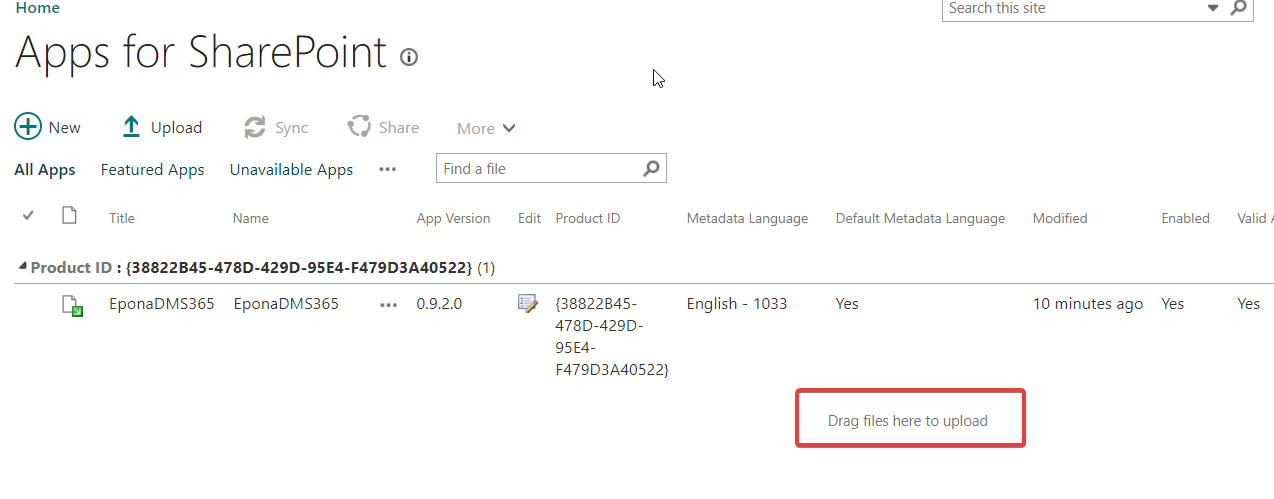
Enable the option Make this solution available to all sites and click on Deploy

The application is installed and deployed.
# SiteCollection App Catalog Installation
Follow these steps to install the EponaDMS365 webpart solution in a single sitecollection. Site collection admin permissions are required. The tenant wide webpart version is ignored (if installed)
This option can also be used to test a new version.
The target sitecollection should be configured as an 'App Catalog' sitecollection using the following powershell
Connect-SPOService -Url https://<tenant>-admin.sharepoint.com
# create site collection app catalog
Add-SPOSiteCollectionAppCatalog -Site https://<tenant>.sharepoint.com/sites/epona
For more information see docs.microsoft.com (opens new window)
When the app catalog is enabled in the sitecollection:
- browse to the url
https://tenant.sharepoint.com/sites/epona/appcatalog - install/deploy the webpart, see Tenant installation
# API Access
After installation approve the MS Graph API permissions, via https://tenant-admin.sharepoint.com/_layouts/15/online/AdminHome.aspx#/webApiPermissionManagement.
Azure ActiveDirectory admin permissions are required to assign the API permissions.

Delegated permissions are used to access the resources in Sharepoint. The application will never be able to access anything the signed in user themselves couldn't access.
More information:
- Introduction to permissions and consent (opens new window)
- Delegated and Application Permissions (opens new window)
# Test Delegated Permissions
Use the Graph Explorer (opens new window) to test the working of delegated permissions.
- Open the Graph Explorer in a browser where a "normal" user is signed into the tenant
- Click on the Sign-in button

- Accept the requested permissions. The graph explorer application can access the resources where there user has access to.
- Change the Url to an url where the user has no access to, for example:
https://graph.microsoft.com/v1.0/sites/epona.sharepoint.com:/sites/HRand click on Run Query
- Copy the Id value in the response preview tab and change the request url to
https://graph.microsoft.com/v1.0/drives/<copied drive-id>and click on Run Query - If not assigned yet, the permissions error will be shown.


- Click on the permissions panel link and assign/consent the Sites.ReadWrite.All (or Sites.Read.All) and accept the requested permissions.

- Execute the request again by pressing on Run Query
Screenshot no permissions
Retry the same steps, but now with a location where the user has access to.
# Microsoft Teams App Catalog
The App can be deployed as an Personal Teams app to Microsoft Teams.
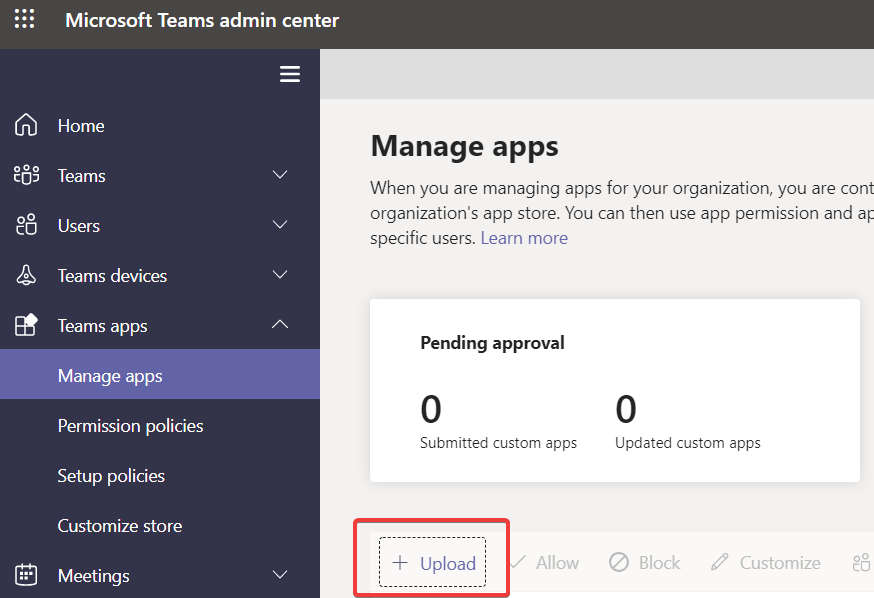
To make the webpart available in MS Teams, open the Manage Apps in the Teams Admin (opens new window).
- Select the Upload button
- Select to the Epona365.zip file.

If DMSforLegal is deployed to a sub sitecollection (not the root), manual update the manifest.json file in the Epona365.zip file.
To use a different sitecollection url (for example /site/eponadms), follow these steps:
- extract the files in the zip file
- open the manifest.json file in a text editor
- update the dest= part of contentUrl in the staticTabs sections to contain the correct url dest=/sites/eponadms/_layouts/15/teamshostedapp.aspx
- update the dest= part of configurationUrl in the configurableTabs sections to contain the correct url dest=/sites/eponadms/_layouts/15/teamshostedapp.aspx
- Save the manifest.json file
- Update the zip file with update manifest.json file (zip file should NOT contain a subfolder)
# Remove app from Teams App Catalog
To remove the app from the Manage Apps in the Teams Adming (opens new window), click on the app. At the app details page, click on the three dots, Actions, Delete

# Microsoft Teams Client Installation
Install the Epona365 app in the Microsoft Teams client or website.
- Open Microsoft Teams and click on the Dots icon to install the app, Search for Epona, Select the EponaDMS365 app

- Click on Add. The app is added and can be pinned to the left navigation bar by right clicking on the app and select Pin

# Update existing installation
To update an existing installation, follow these steps.
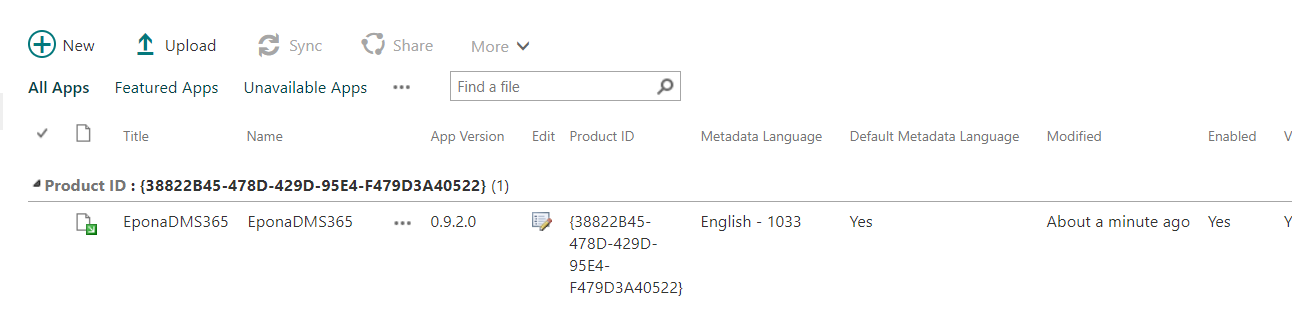
- Open the App Catalog
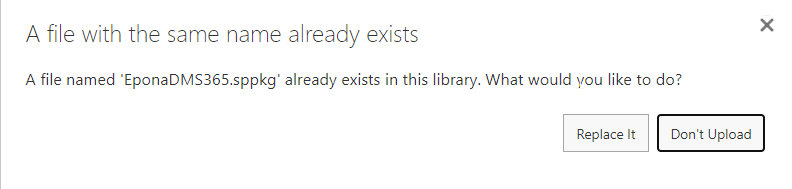
- Select Apps for Sharepoint and drag/drop the file EponaDMS365.sppkg into the list and confirm with Replace it. Ena
- Enable the option Make this solution available to all sites and click on Deploy\
- Refresh the Microsoft Teams app or webpage to use the updated version
No changes are necessary in the Microsoft Teams app catalog.
# Sharepoint Fullpage App
Create a new SitePage, named Epona365.aspx and add the EponaDMS365 webpart to the page.
Modify the permissions of the new page (via Site Pages, Manage Access) and give Users Read permissions.
User PnP.Powershell to update the layout of the page to a single webpart page.
Connect-PnPOnline -Url https://contoso.sharepoint.com/sites/epona
Set-PnPPage -Identity "<pagename>" -LayoutType SingleWebPartAppPage
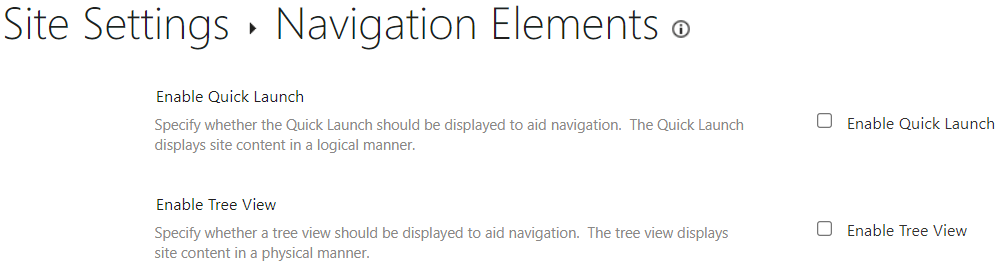
Disable the quick launch navigation elements via the Site Settings.
It's also possible to create a link without a page to show the Epona DMS365 app in a full page.
/_layouts/15/apppagehost.aspx?componentId=65a87007-ac17-41b6-ace1-b1755acd42f3
If you also want to remove the Sharepoint controls on the page append the querystring parameter env=Embedded
/_layouts/15/apppagehost.aspx?componentId=65a87007-ac17-41b6-ace1-b1755acd42f3&env=Embedded
# Sharepoint Search box
Use the pnp Set-PnPSearchSettings (opens new window) commandlet to hide the search bar in Sharepoint (for the current sitecollection or web (subsite)).

# Epona365 Urischeme extender
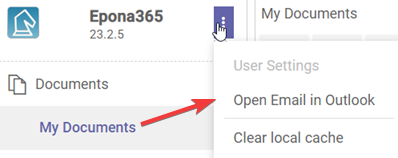
When this tool is locally installed, emails actions (like create/reply/send via attachment/link) can be executed using the local Outlook installation. The DMSforLegal active Outlook profile is used to authenticate to the sharepoint environment and should be configured, but doesn't have to be active.
(de)Active the option "Open Email in Outlook" via:
Copy the Epona.Dms.Desktop.UriSchemeHandler to the windows desktop and register it once via the commandline:
To install the handler for the current user, run:
Epona.Dms.Desktop.UriSchemeHandler.exe /InstallUser
To uninstall the handler for the current user, run:
Epona.Dms.Desktop.UriSchemeHandler.exe /UninstallUser
To install the handler for the local machine, run:
Epona.Dms.Desktop.UriSchemeHandler.exe /InstallMachine
To uninstall the handler for the local machine, run:
Epona.Dms.Desktop.UriSchemeHandler.exe /UninstallMachine
If this feature is visible/enabled, can be set via the DMS Config tool.
This tool will make the following urls possible on the windows desktop. Append |mc|mattercode to also specify a target mattercode.
epona365://view|u|https://XXX.sharepoint.com/sites/XX/Shared%20Documents/Email/email%20ap%2020230626%201317.msg
epona365://reply|u|https://XXX.sharepoint.com/sites/XX/Shared%20Documents/Email/email%20ap%2020230626%201317.msg
epona365://replyall|u|https://XXX.sharepoint.com/sites/XX/Shared%20Documents/Email/email%20ap%2020230626%201317.msg
epona365://forward|u|https://XXX.sharepoint.com/sites/XX/Shared%20Documents/Email/email%20ap%2020230626%201317.msg
epona365://create|u|mc|mattercode